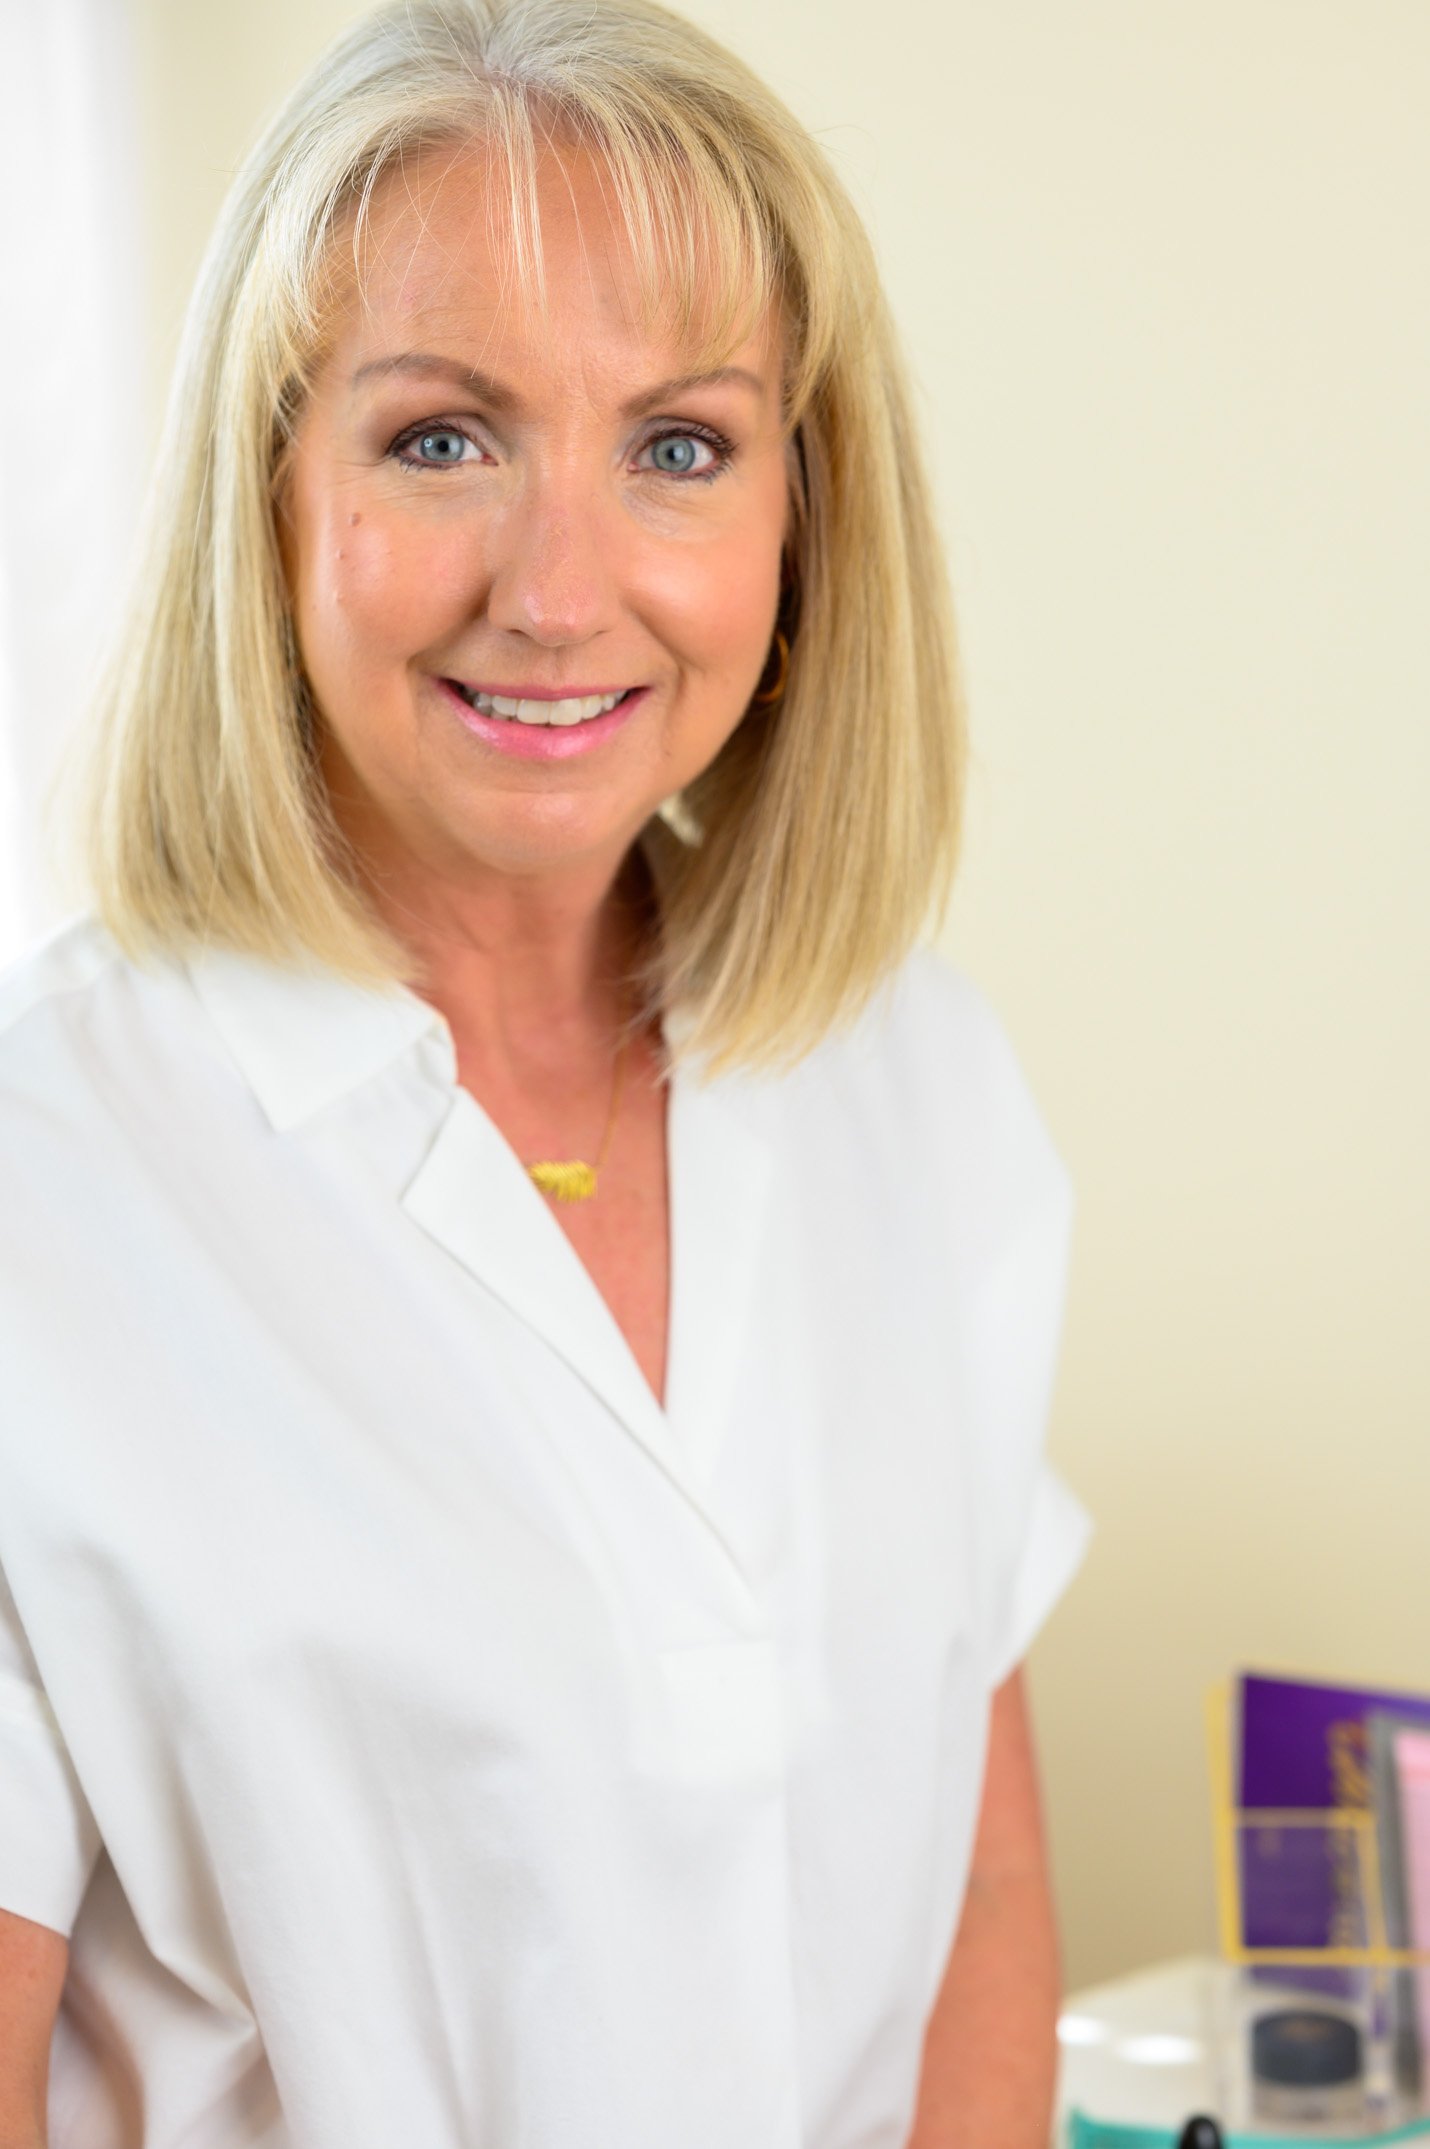
Well, many of you asked for it. So today I deliver. I’m sharing my current makeup routine today. I like to think of this as a fresh face makeup routine for women 40+. This is not a pared down routine, by the way. Instead, this is pretty much my full routine that I use when I’m getting ready to go to church or anywhere else. But I’m using colors that help create a natural, fresh face look.
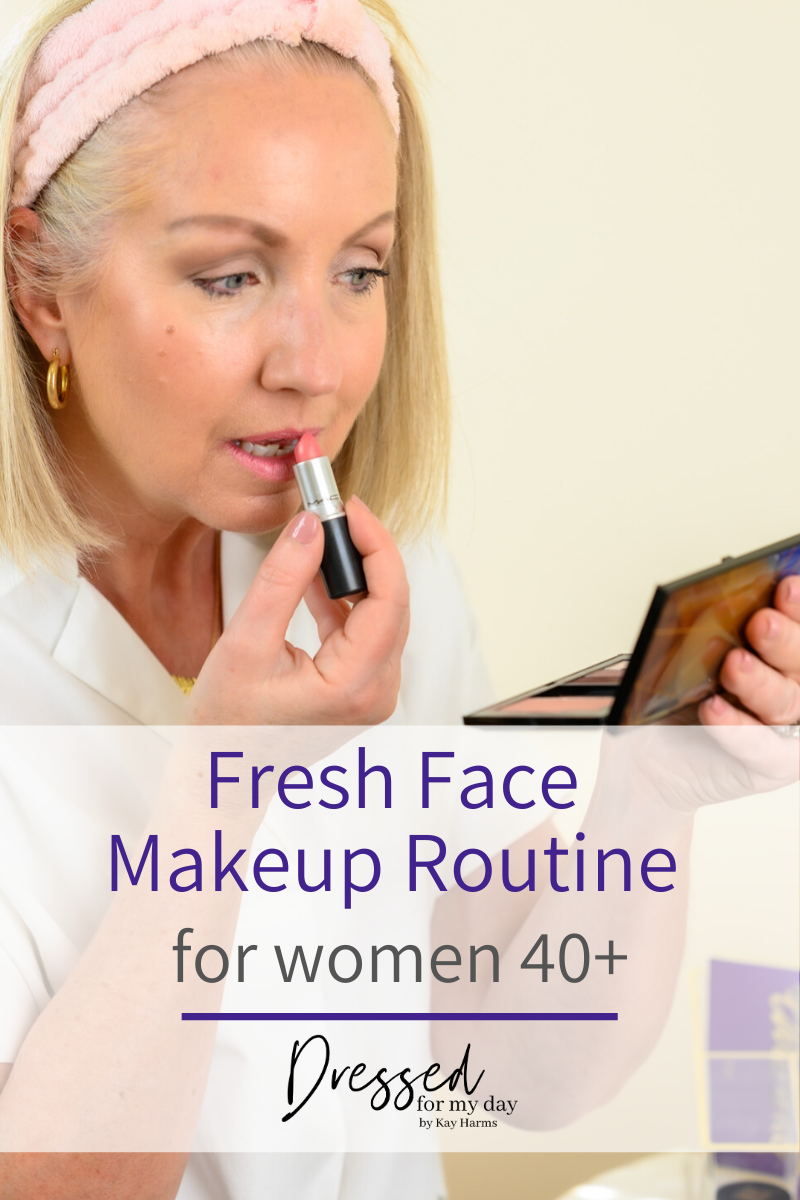
Now prepare yourself to see some ug-lee pictures. Ha! No, I’m not bashing myself (or my precious photographer!). But no one looks great mid-makeup session. Amiright? But I’m willing to take one for the team here to give you step by step procedures and up close insight into my routine.
What is it about us humans that makes us love getting a peek into other peoples’ routines? It’s true. Most of us love to know how other people make coffee, clean their houses, manage their mornings and put on their makeup. I know I do. I guess we just want to know if we’re “doing it right.”
But keep in mind, I’m no expert. I’ve had lots of makeup lessons from various levels of experts throughout my life, and I’ve paid attention to makeup tutorials in magazines and YouTube videos. So maybe I have a few tips to divulge. But mostly I’m just sharing the products I use and the order in which I apply them.
Let’s get started!
Step #1 – Skin Prep
I’m not detailing my entire skin care routine here. But I’ve been using Mary Kay TimeWise Miracle Set 3D for the past couple of months. I appreciate the ease of this set, and it does keep my skin feeling nourished, soft, moisturized and clean. My Mary Kay representative, Sheryl, has offered a $10 discount on your first order if you would like to order skincare, any of the makeup I’ll be sharing or other Mary Kay products through her. And she does ship for free. The links I’m including in the Mary Kay products go straight to her online store.

To shop Sheryl’s Mary Kay online store (at the Mary Kay website), just use the code “dressed for my day” in the promo code space to receive a $10 discount on your order. She wanted me to let you know that you could also host a virtual party and earn products, if you’re interested. She’s so very gracious. And I do love my Mary Kay products.
But after washing my face with the TimeWise® Age Minimize 3D® 4-in-1 Cleanser in the shower, the first thing I do really is apply my Timeless Skin Care 20% Vitamin C Plus E Ferulic Acid Serum. Several readers had suggested applying a topical Vitamin C last spring, so I gave this one a try. It came highly recommended because of the dispenser which keeps the product from oxidizing as quickly as others. Plus it contains all the elements you want in a good vitamin C serum.
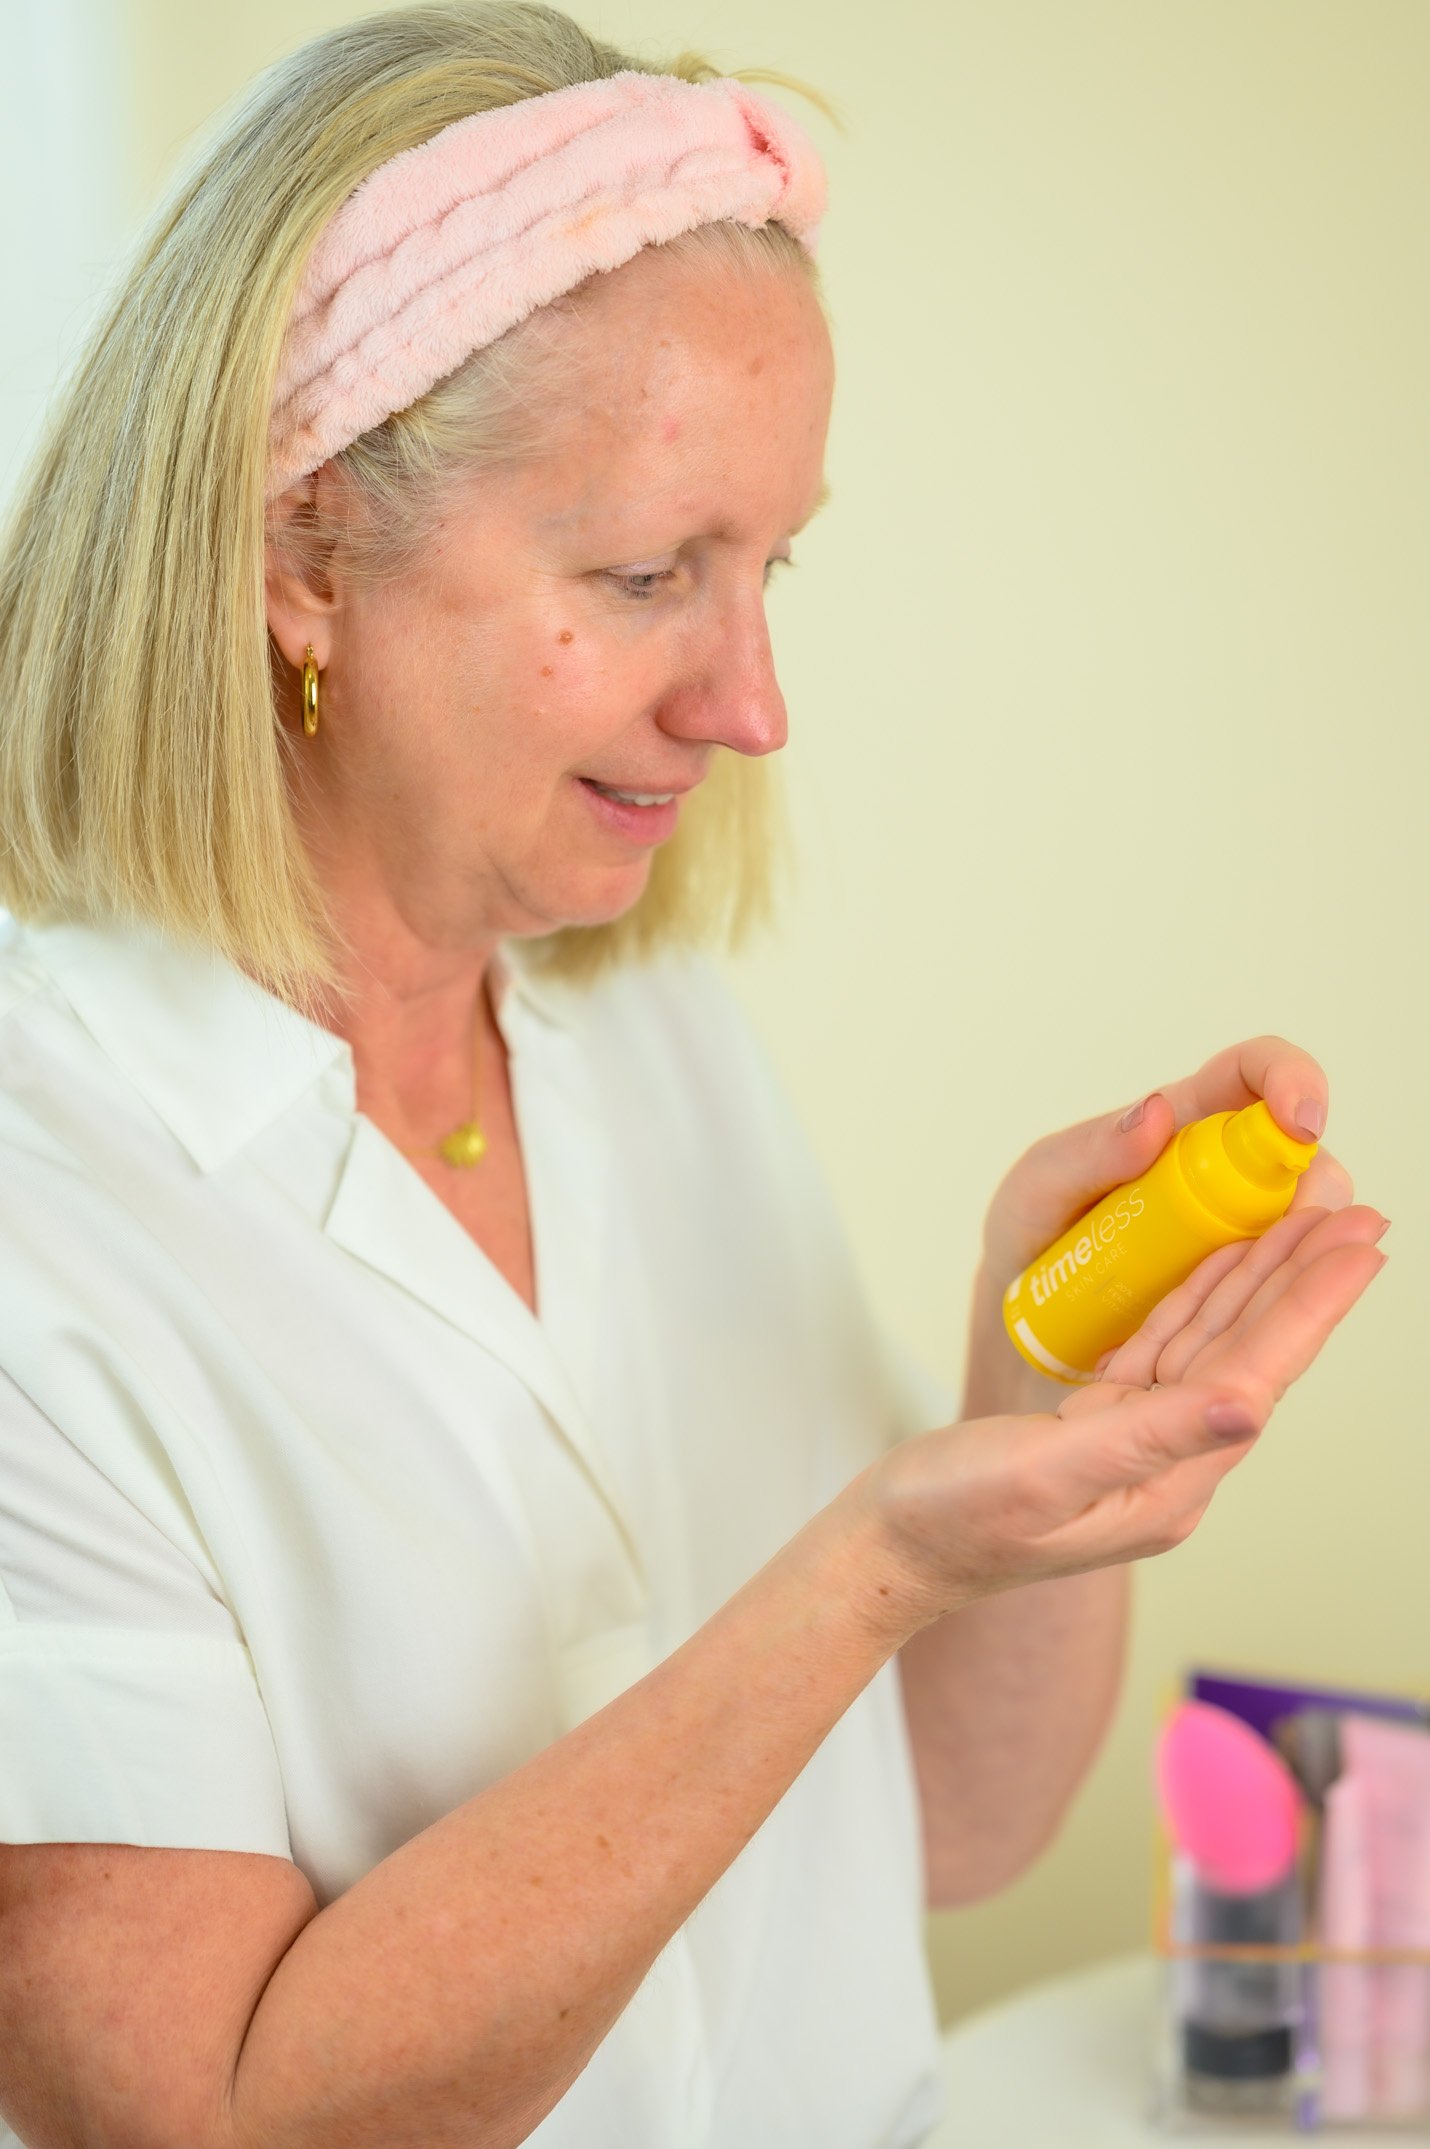
I really can tell a big difference in the health of my skin from using the Vitamin C, so I will be ordering this product again. It helps improve skin tone and builds collagen, helping with elasticity and firmness.
I let the Timeless Skin Care 20% Vitamin C Plus E Ferulic Acid Serum absorb into my skin and dry while I get dressed a bit. Then I apply my TimeWise® Age Minimize 3D® Eye Cream. I apply only a little pea size dot of the cream around the brow bone and down under my eyes with my left hand ring finger, patting it in gently.
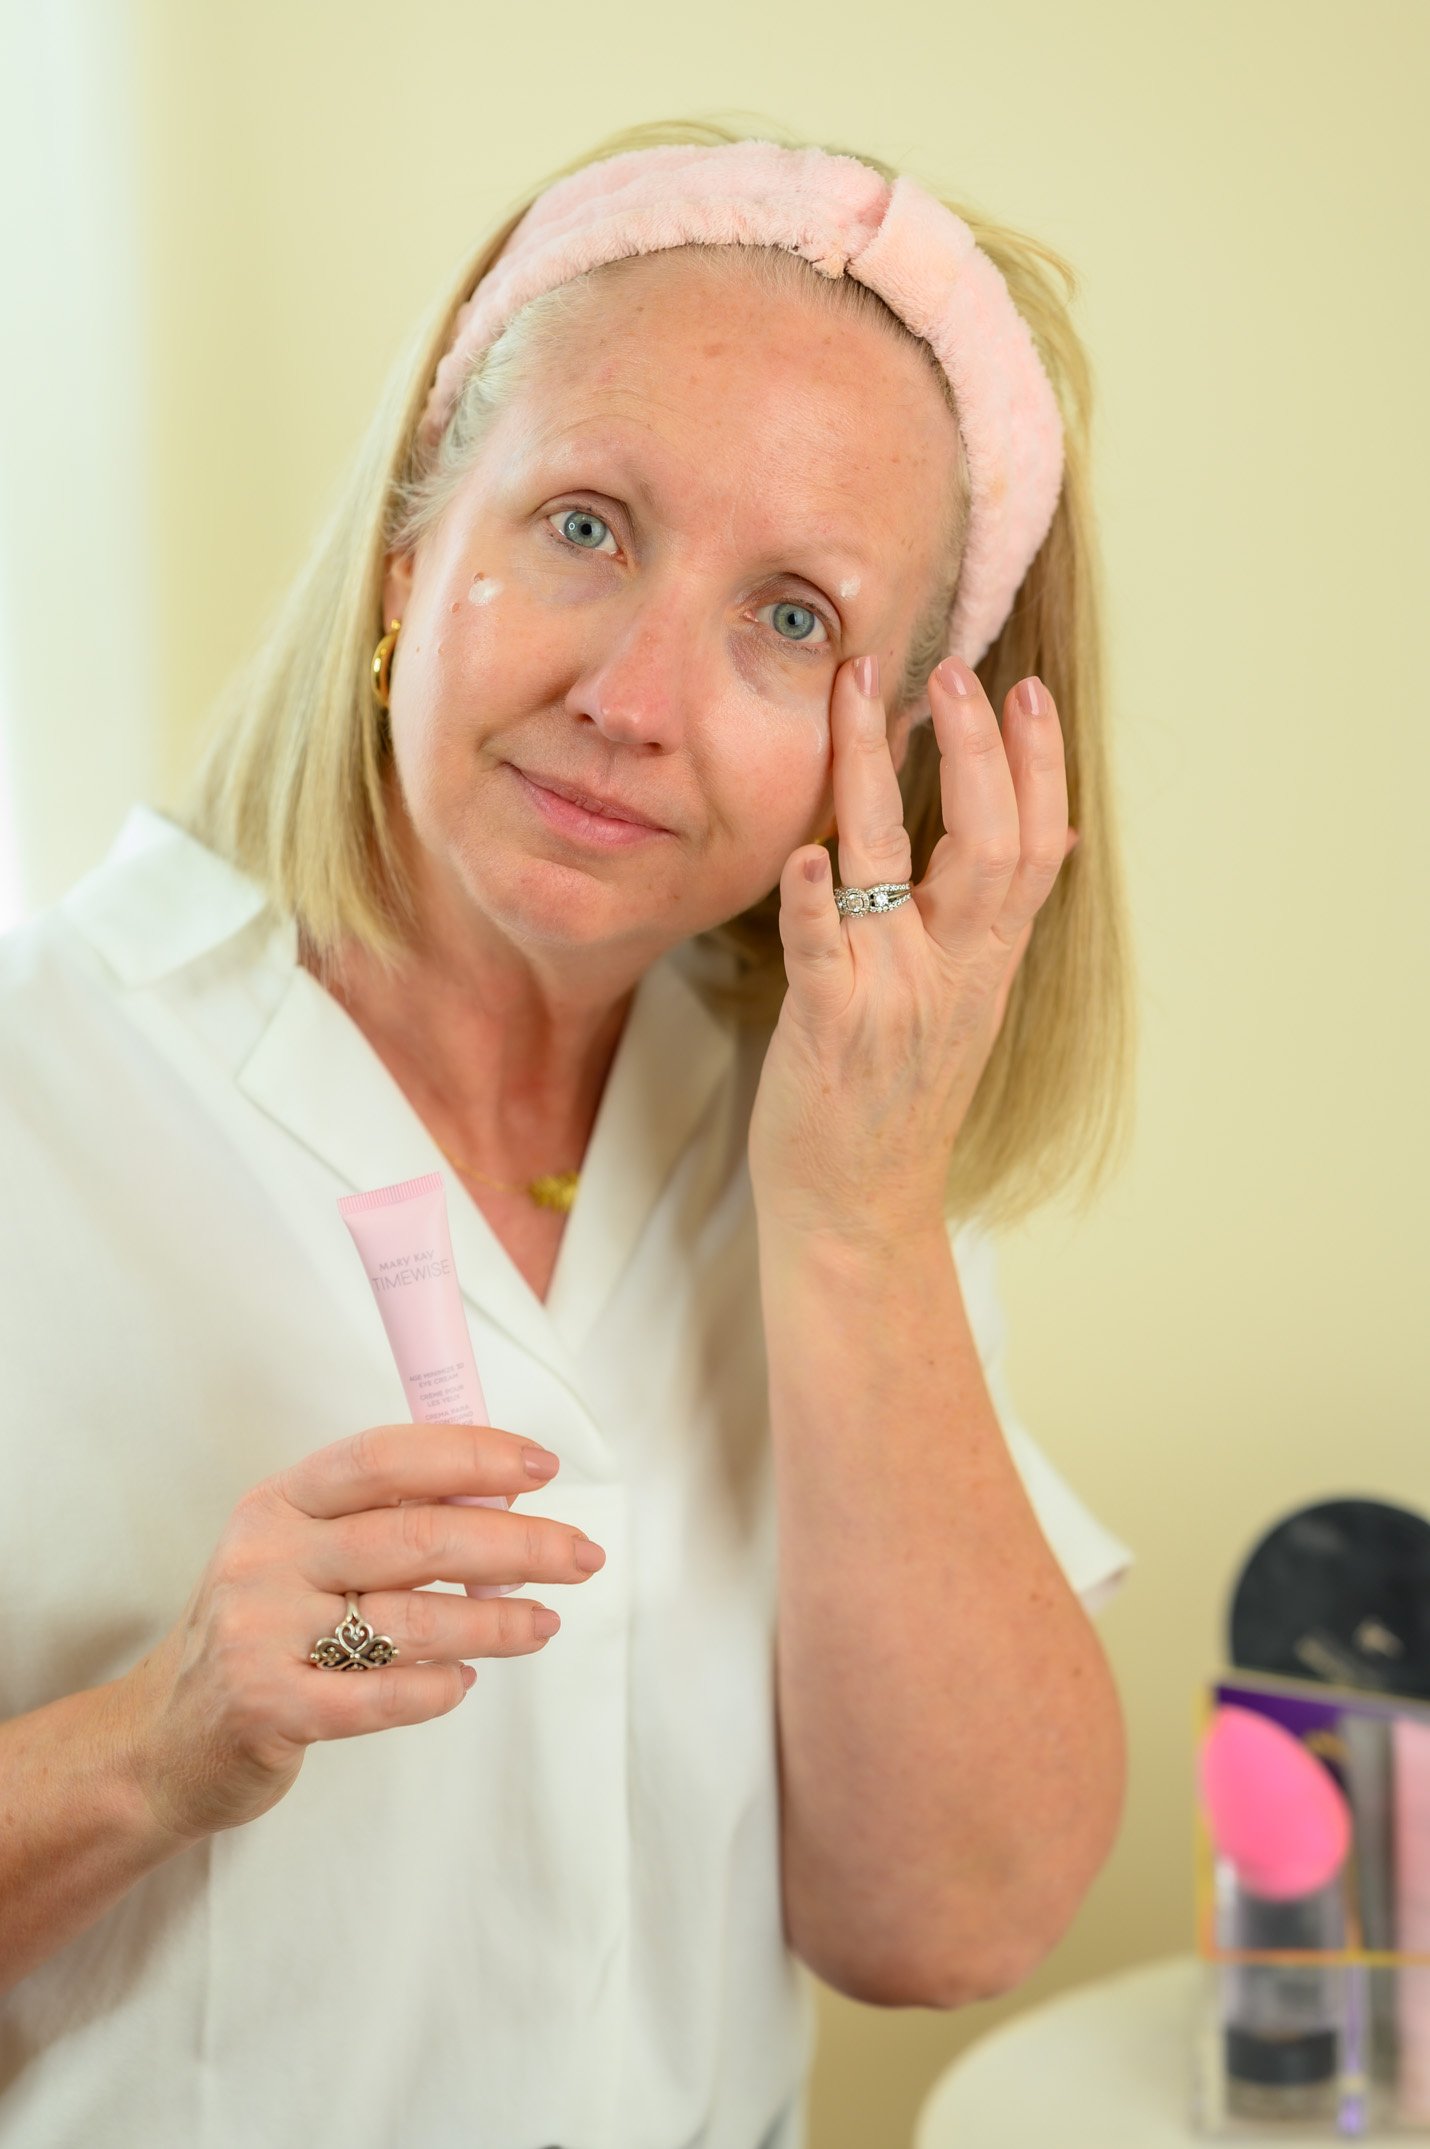
Eye cream helps keep the sensitive skin around your eyes moisturized and firm. It also provides a nice surface on which to apply your eye makeup. I find it a must.
Next I apply Estee Lauder Double Wear Stay-in-Place Eyeshadow Base with this Estee Lauder wide paddle foundation brush. This lightweight dry cream long-wear base for powder eyeshadow keeps your eyecolor in place with 15-hour staying power. It also keeps your powder shadow from creasing. I’ve been wearing this product for years and years, and have never found anything else I like as well.
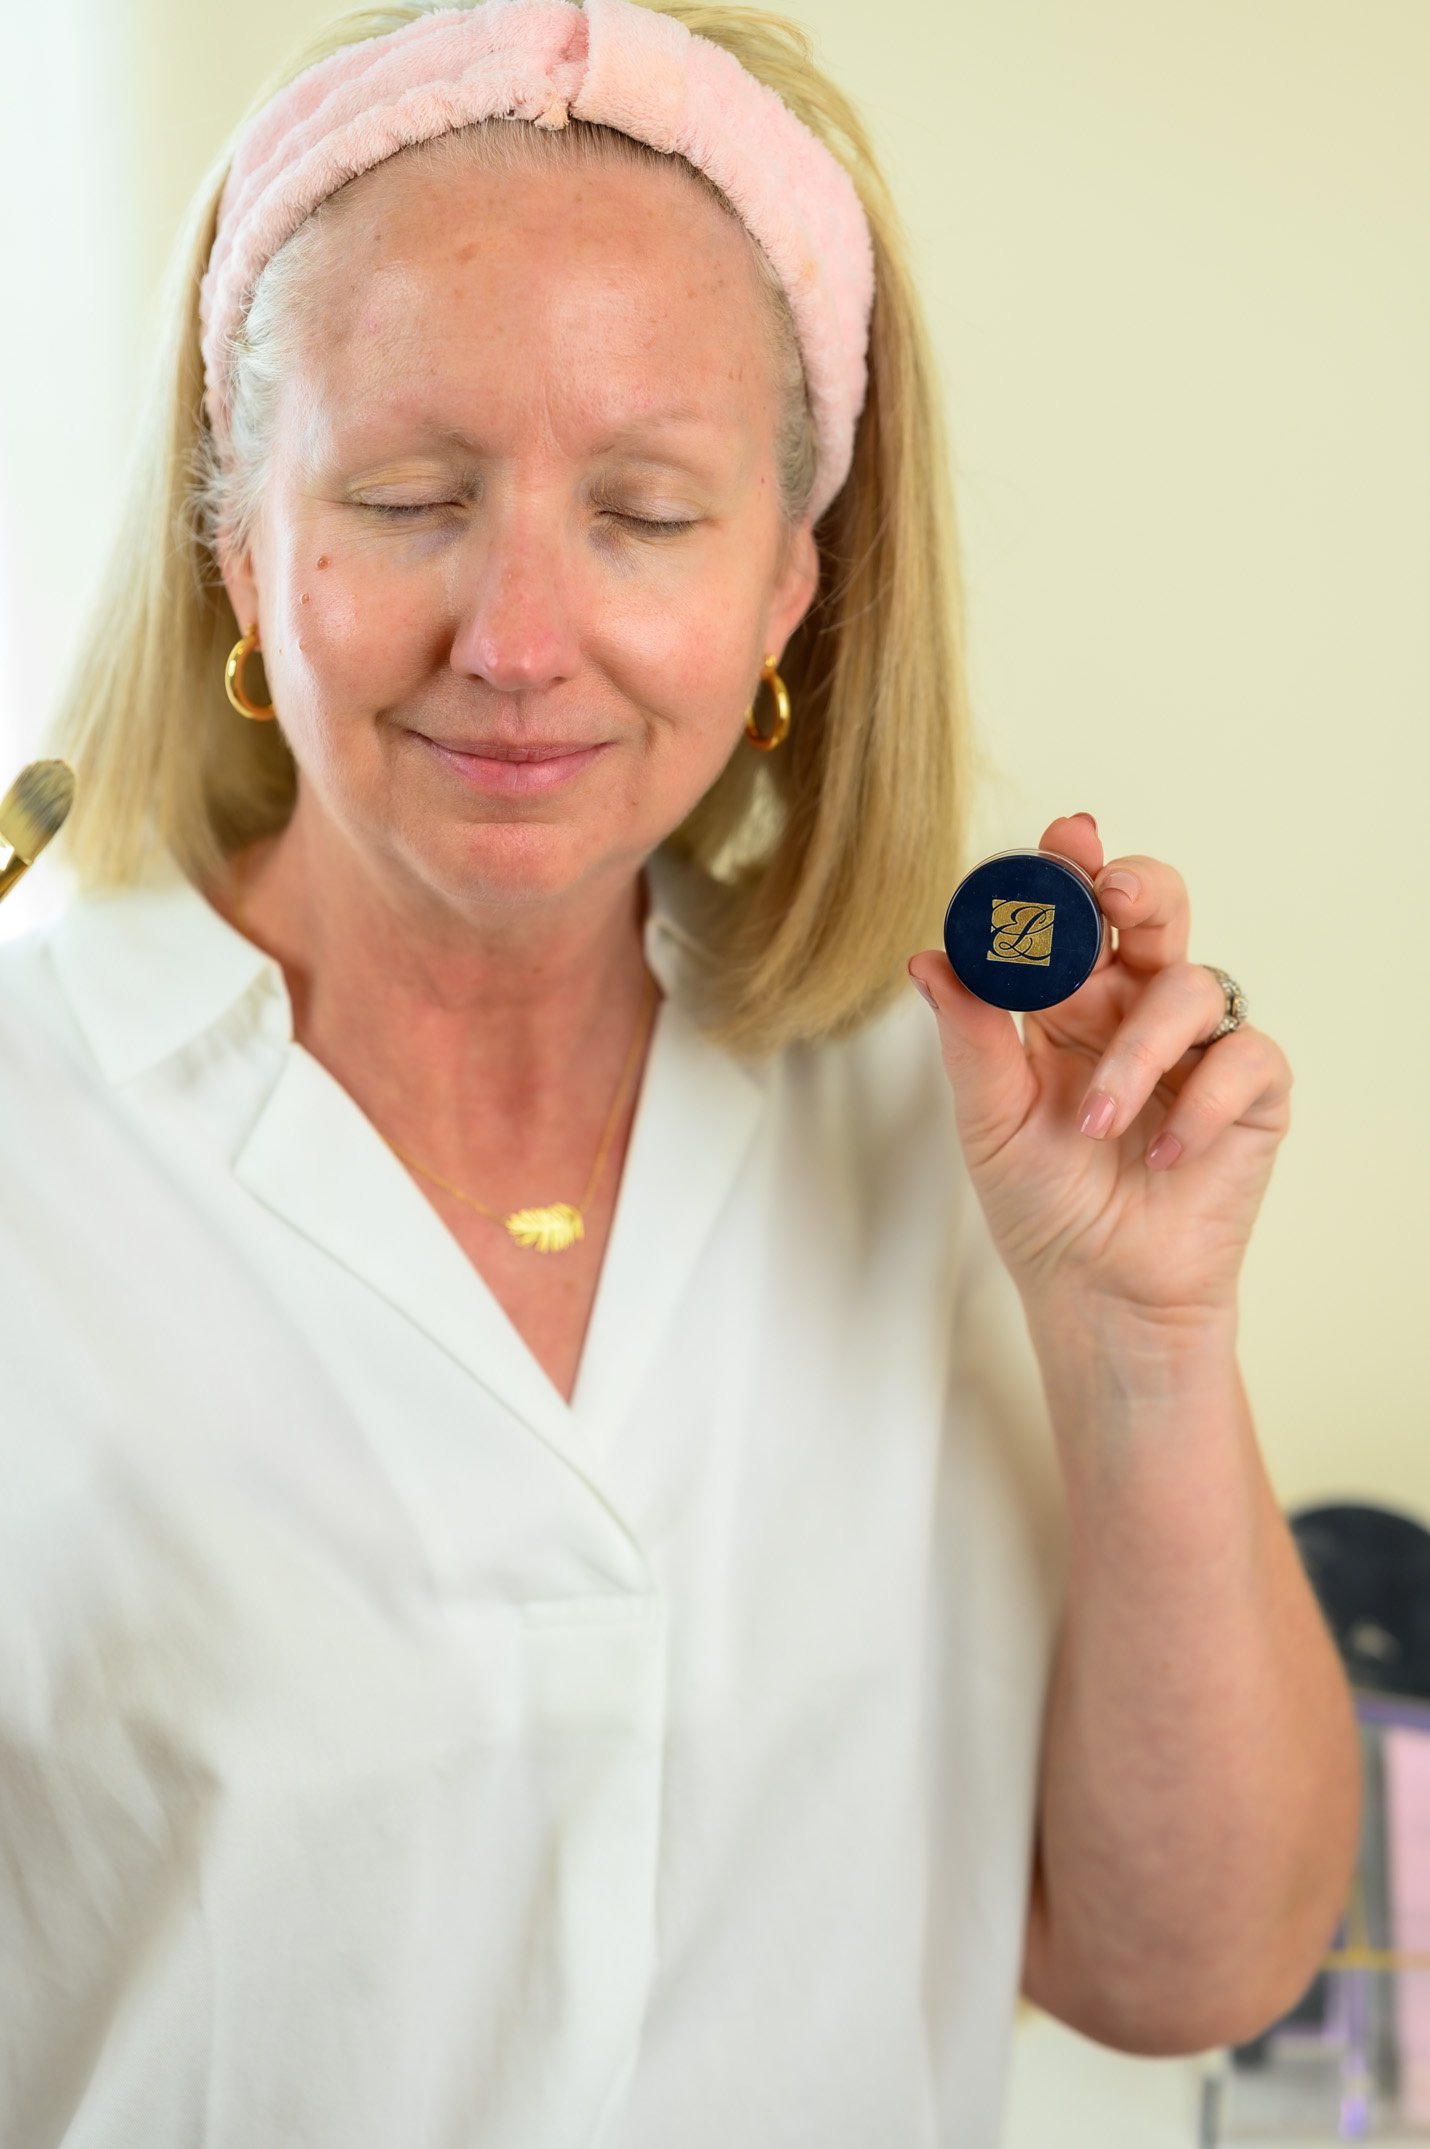
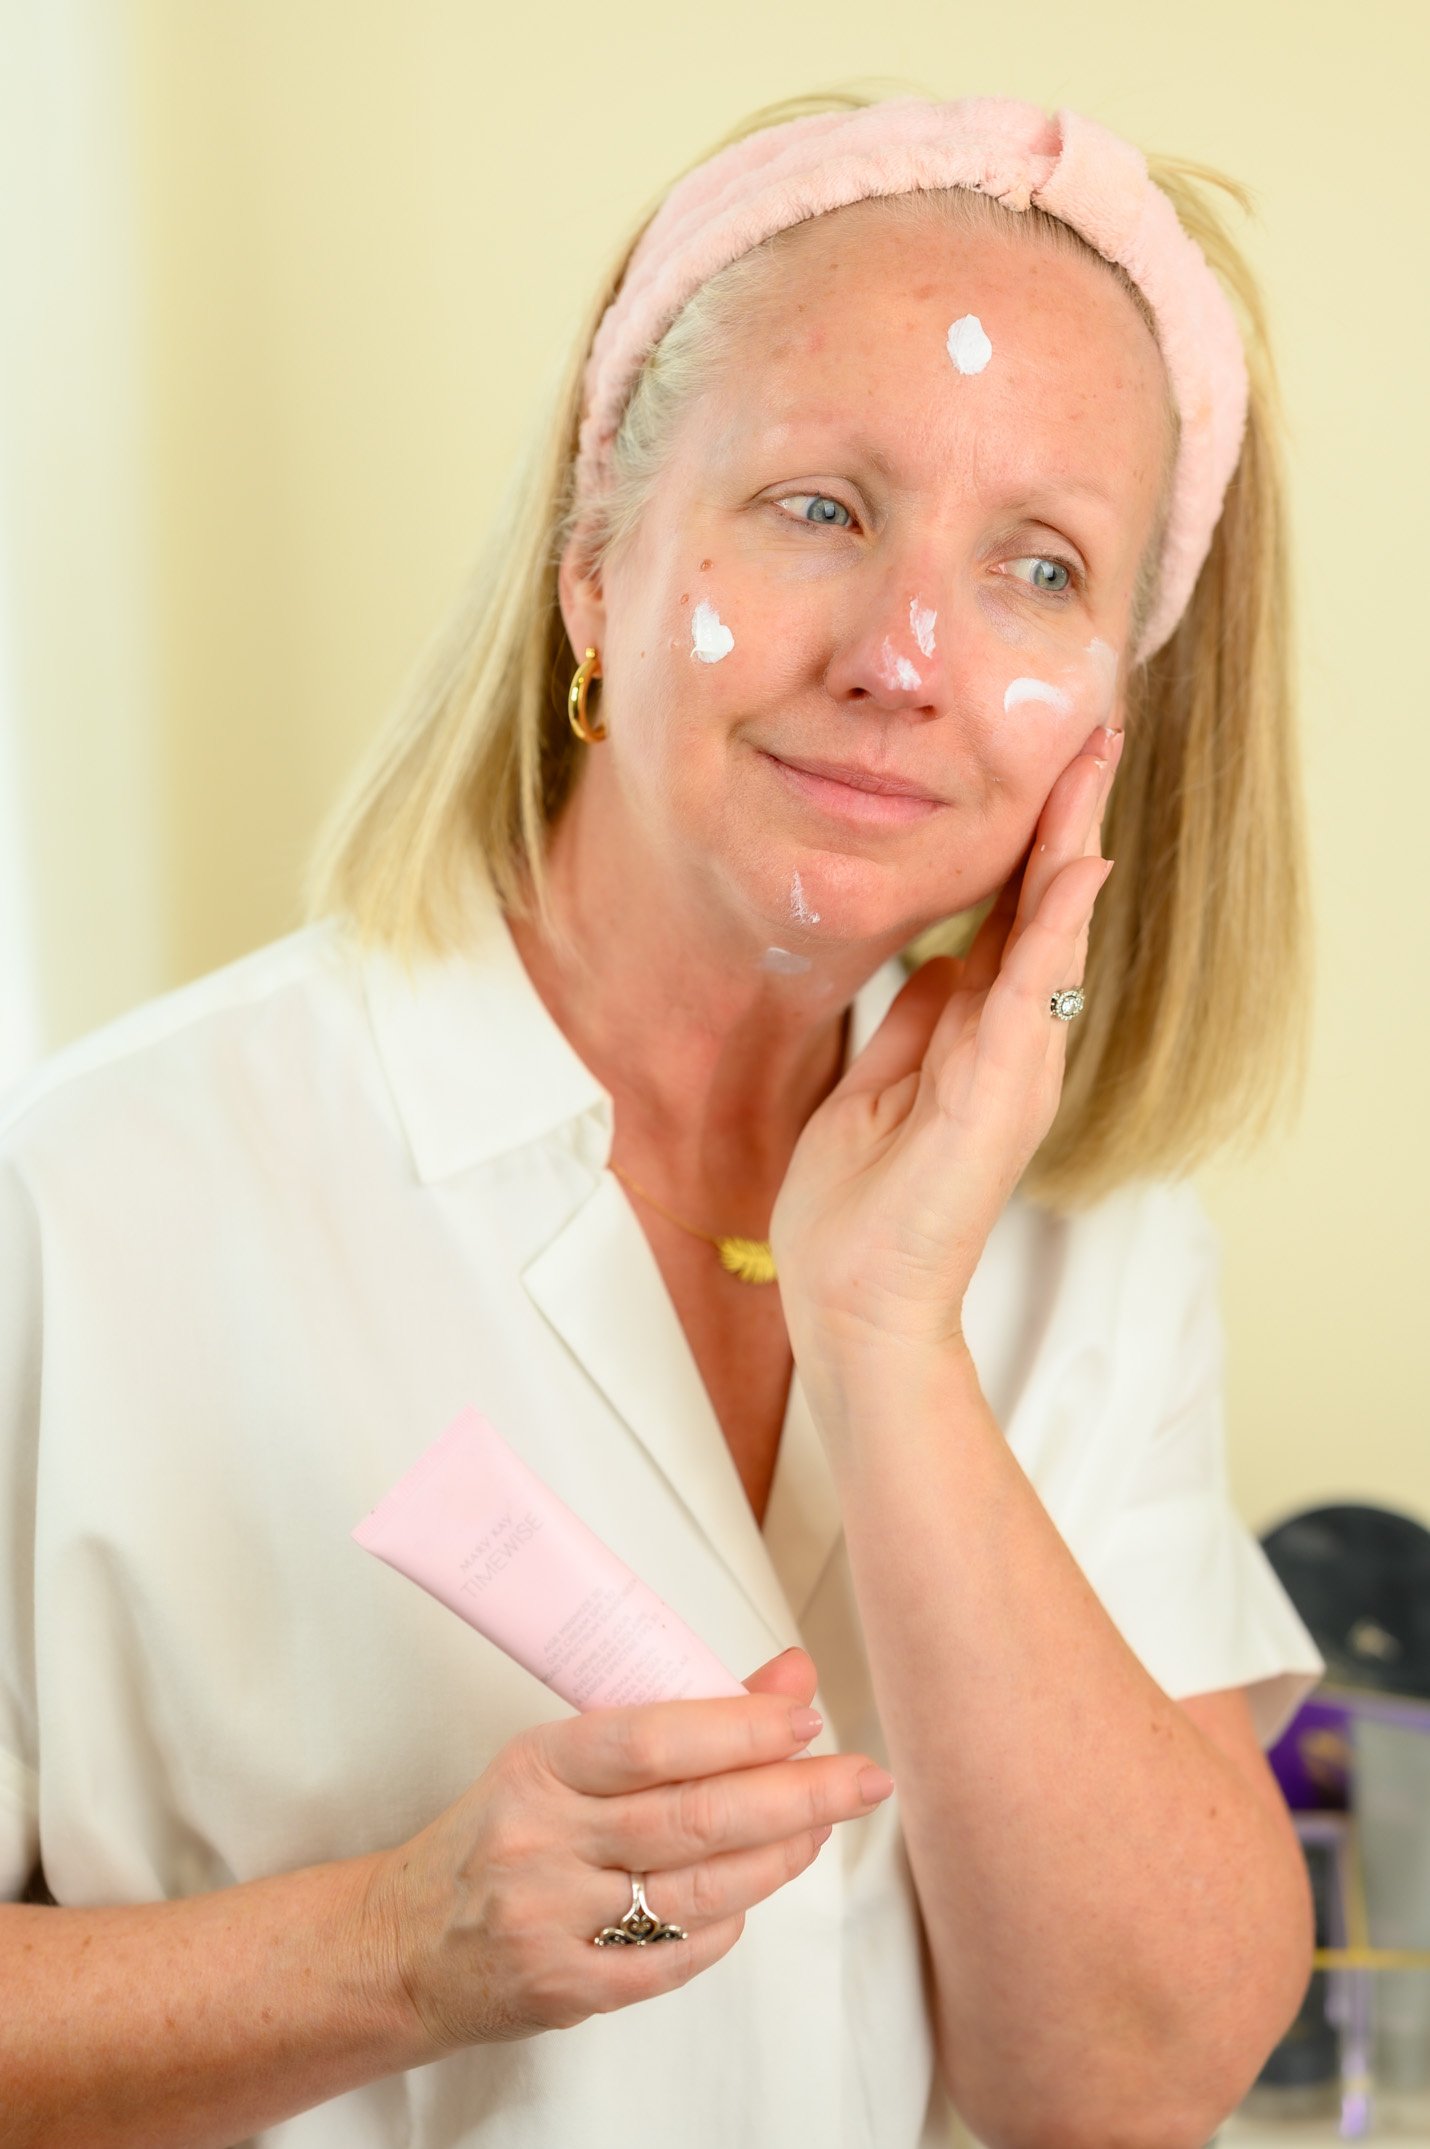
The Estee Lauder Double Wear Stay-in-Place Eyeshadow Base is really a kind of dry (but not drying) cream, so it needs to set a bit before applying your shadow. So then I apply my moisturizer. Like I said, I’m using the TimeWise® Age Minimize 3D® Day Cream SPF 30 Broad Spectrum Sunscreen. You can also get the moisturizer without the sunscreen if you prefer. I use a dot of cream about the size of a dime for my entire face.
While my moisturizer is absorbing a bit, I apply the rest of my eye makeup.
Step #2 – Eye Makeup
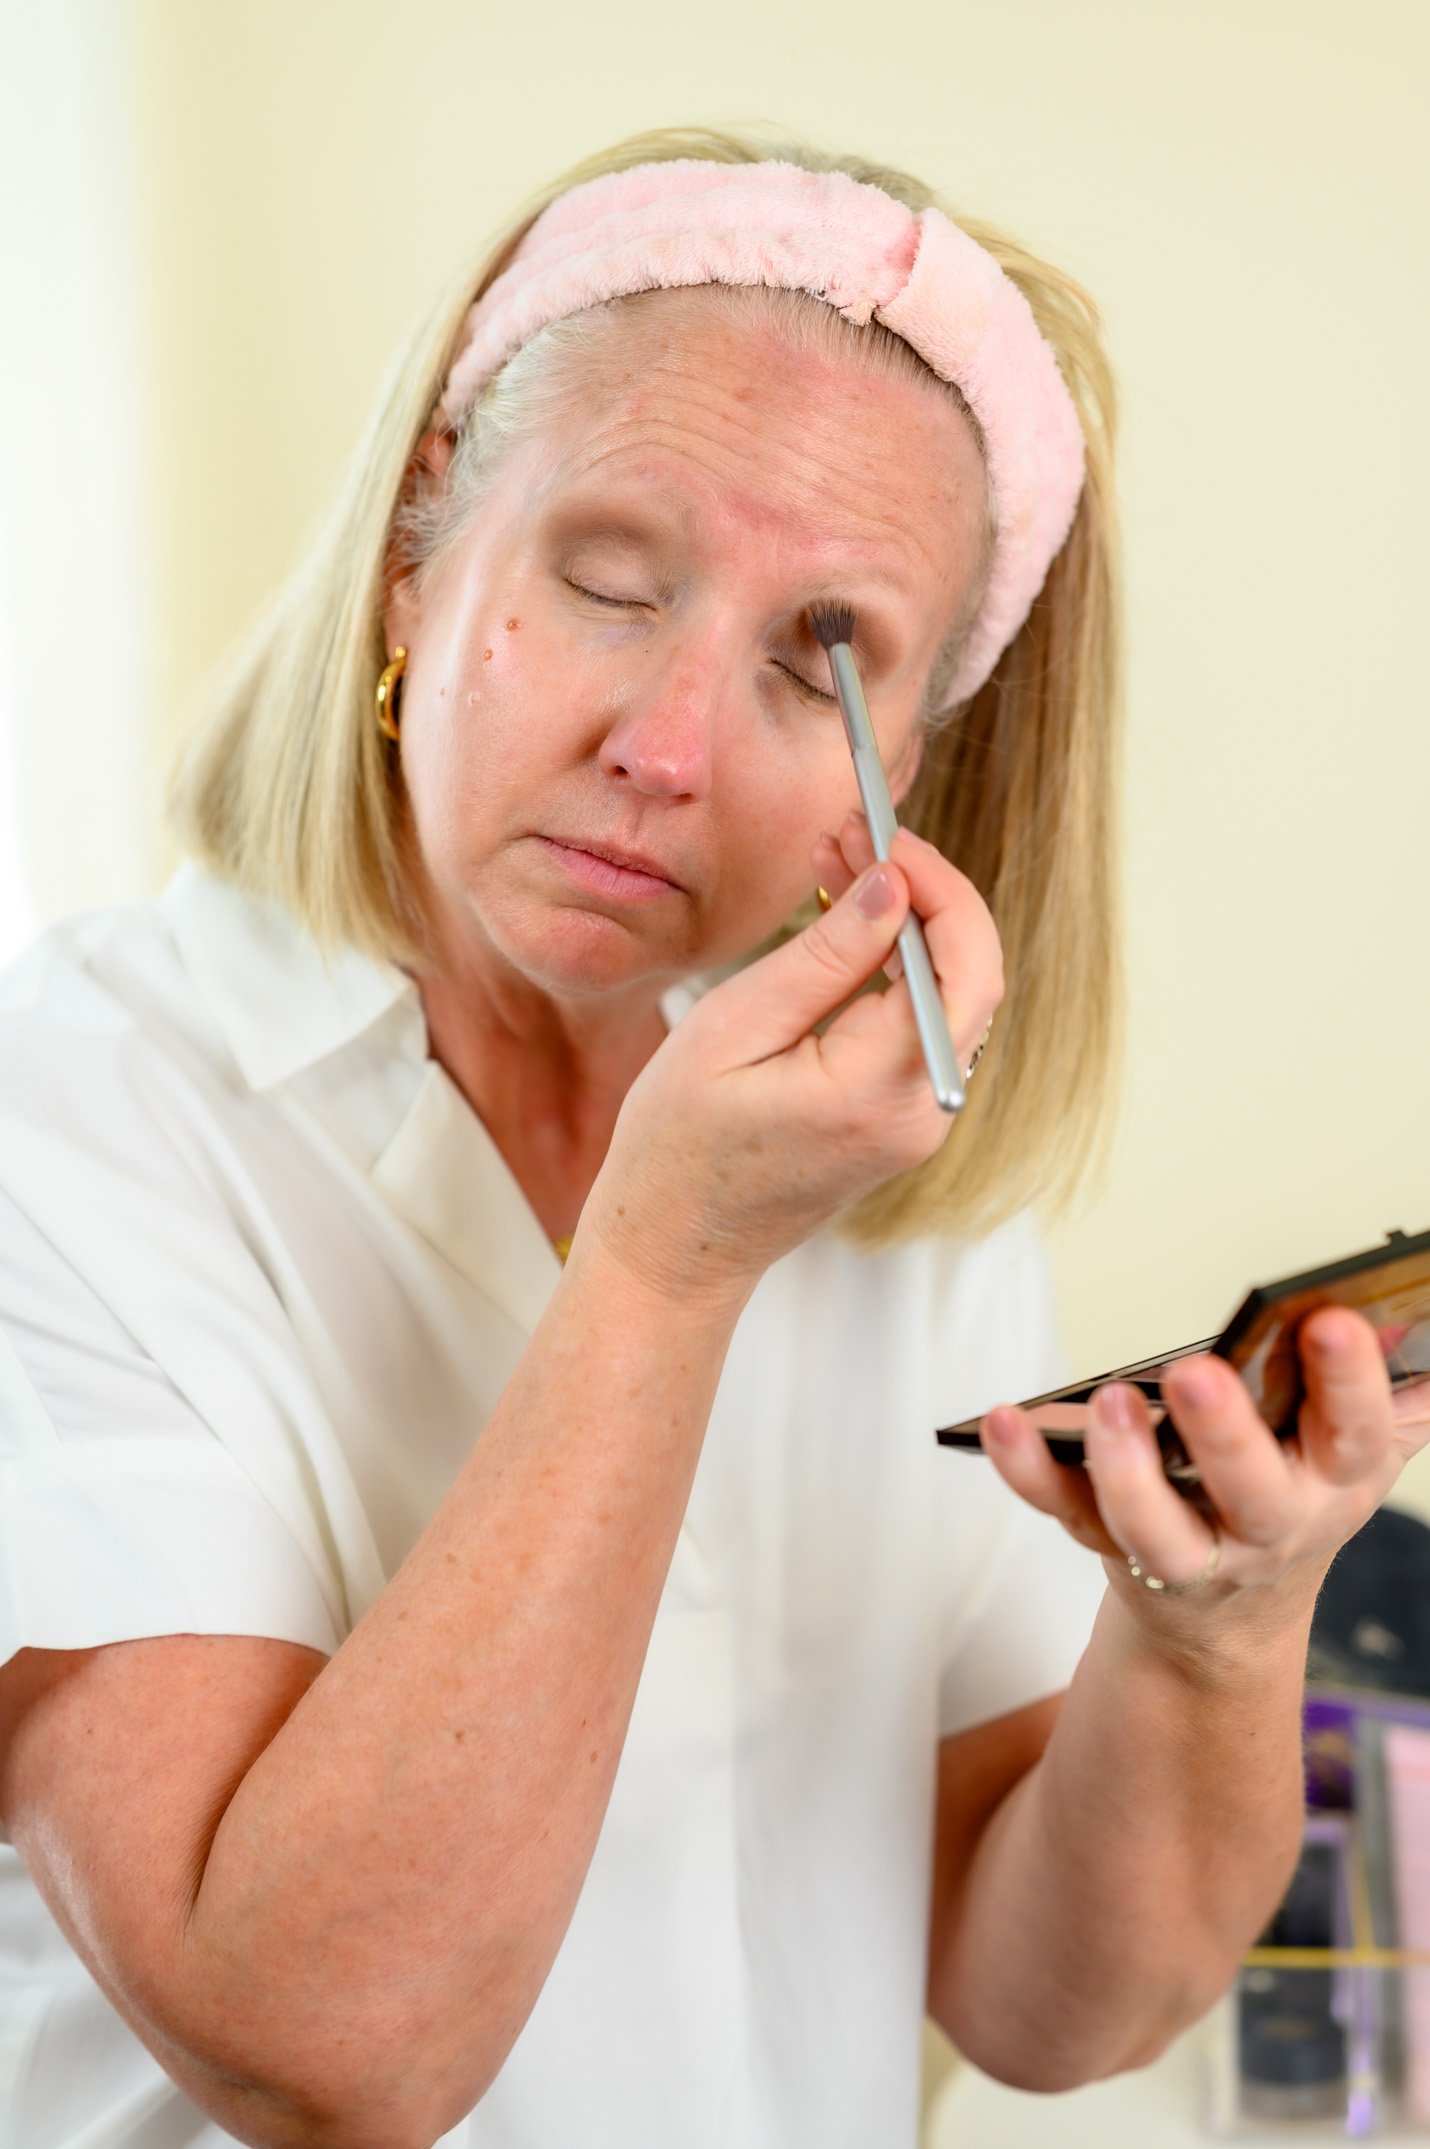
Once the Estee Lauder Double Wear Stay-in-Place Eyeshadow Base feels dry to the touch, I apply my eyeshadow. I have two different palettes I’m enjoying equally right now. I love the Tarte Tartlette Clay Matte Eyeshadow Palette because all the shades are mattes and they’re just pretty and natural looking. They’re highly pigmented, so you don’t need to apply much product. And they smell lovely! The shadows go on smoothly and blend well, without becoming muddy.
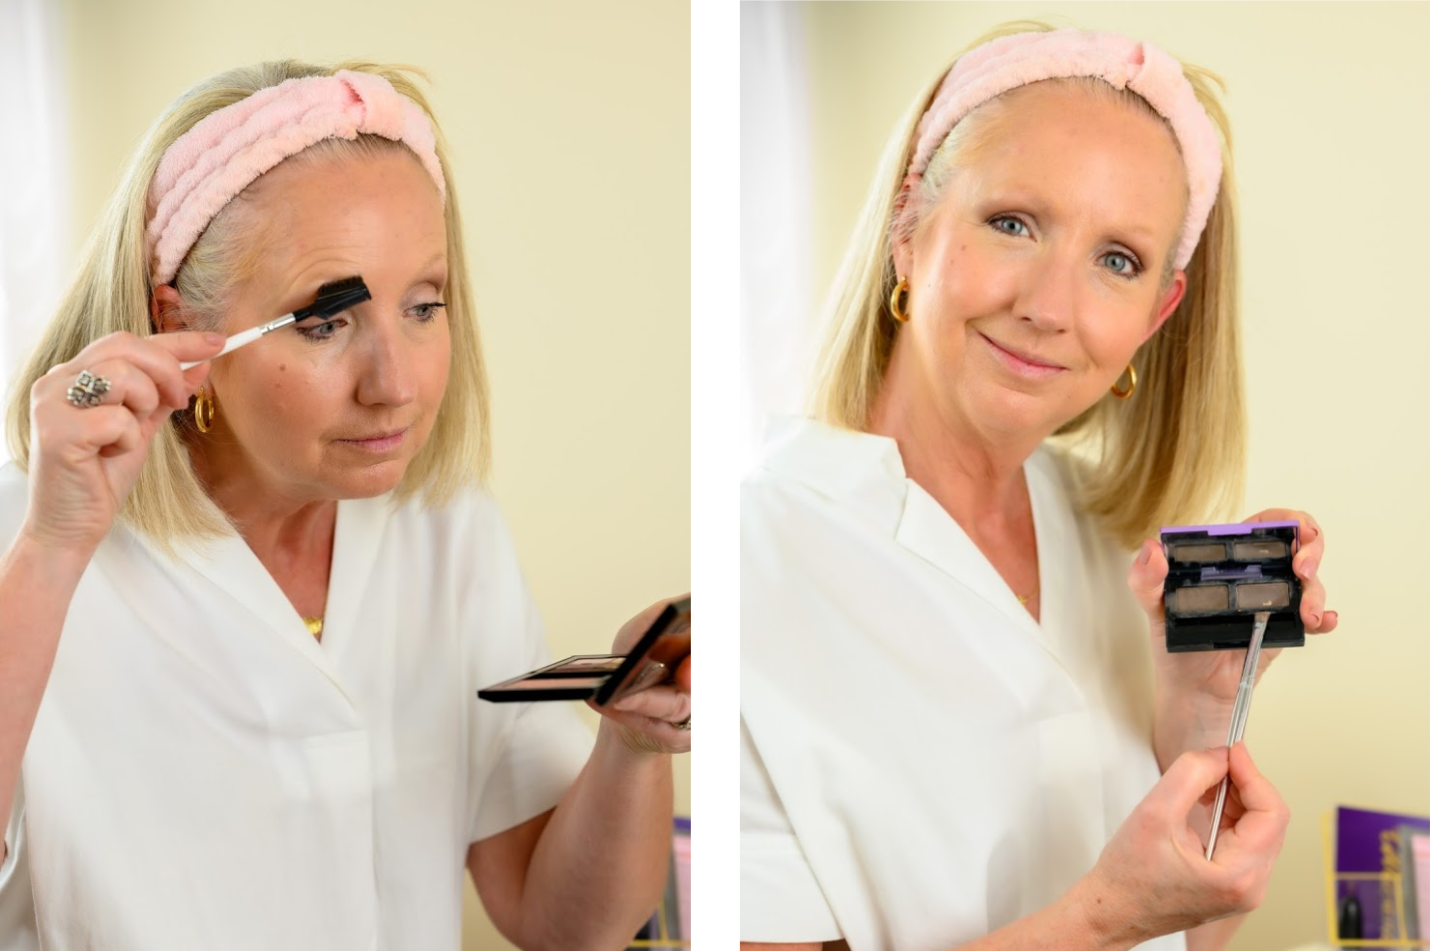
But here I’m showing the palette I put together from Mary Kay. That’s one of the nice things about Mary Kay eyeshadows and blushes. You get to put together your own palette. First I apply “biscotti” all over the surface of my eye lid with this It Cosmetics Dual Eyeshadow Brush. The shadow goes on soft, evenly and easily with very little product on my brush.
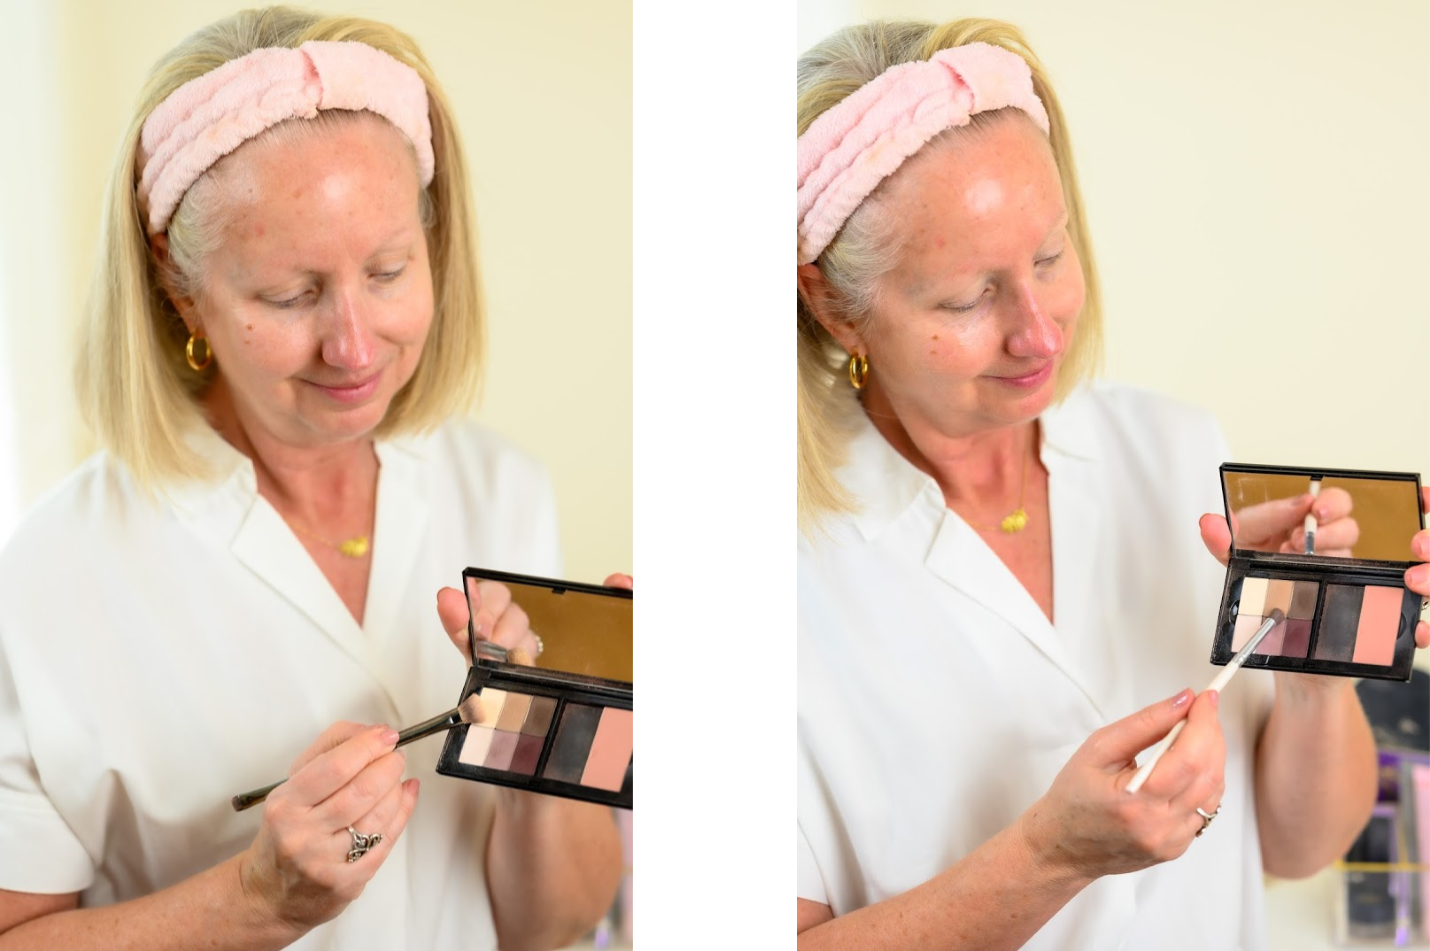
After I have the light color all over the surface of my lids, I apply hazelnut shadow just in the crease and around the outer edge down toward my outer lashes, in the shape of a boomerang. For this more precise application, I use a Bullet Crease Brush, applying in a gentle circular motion.
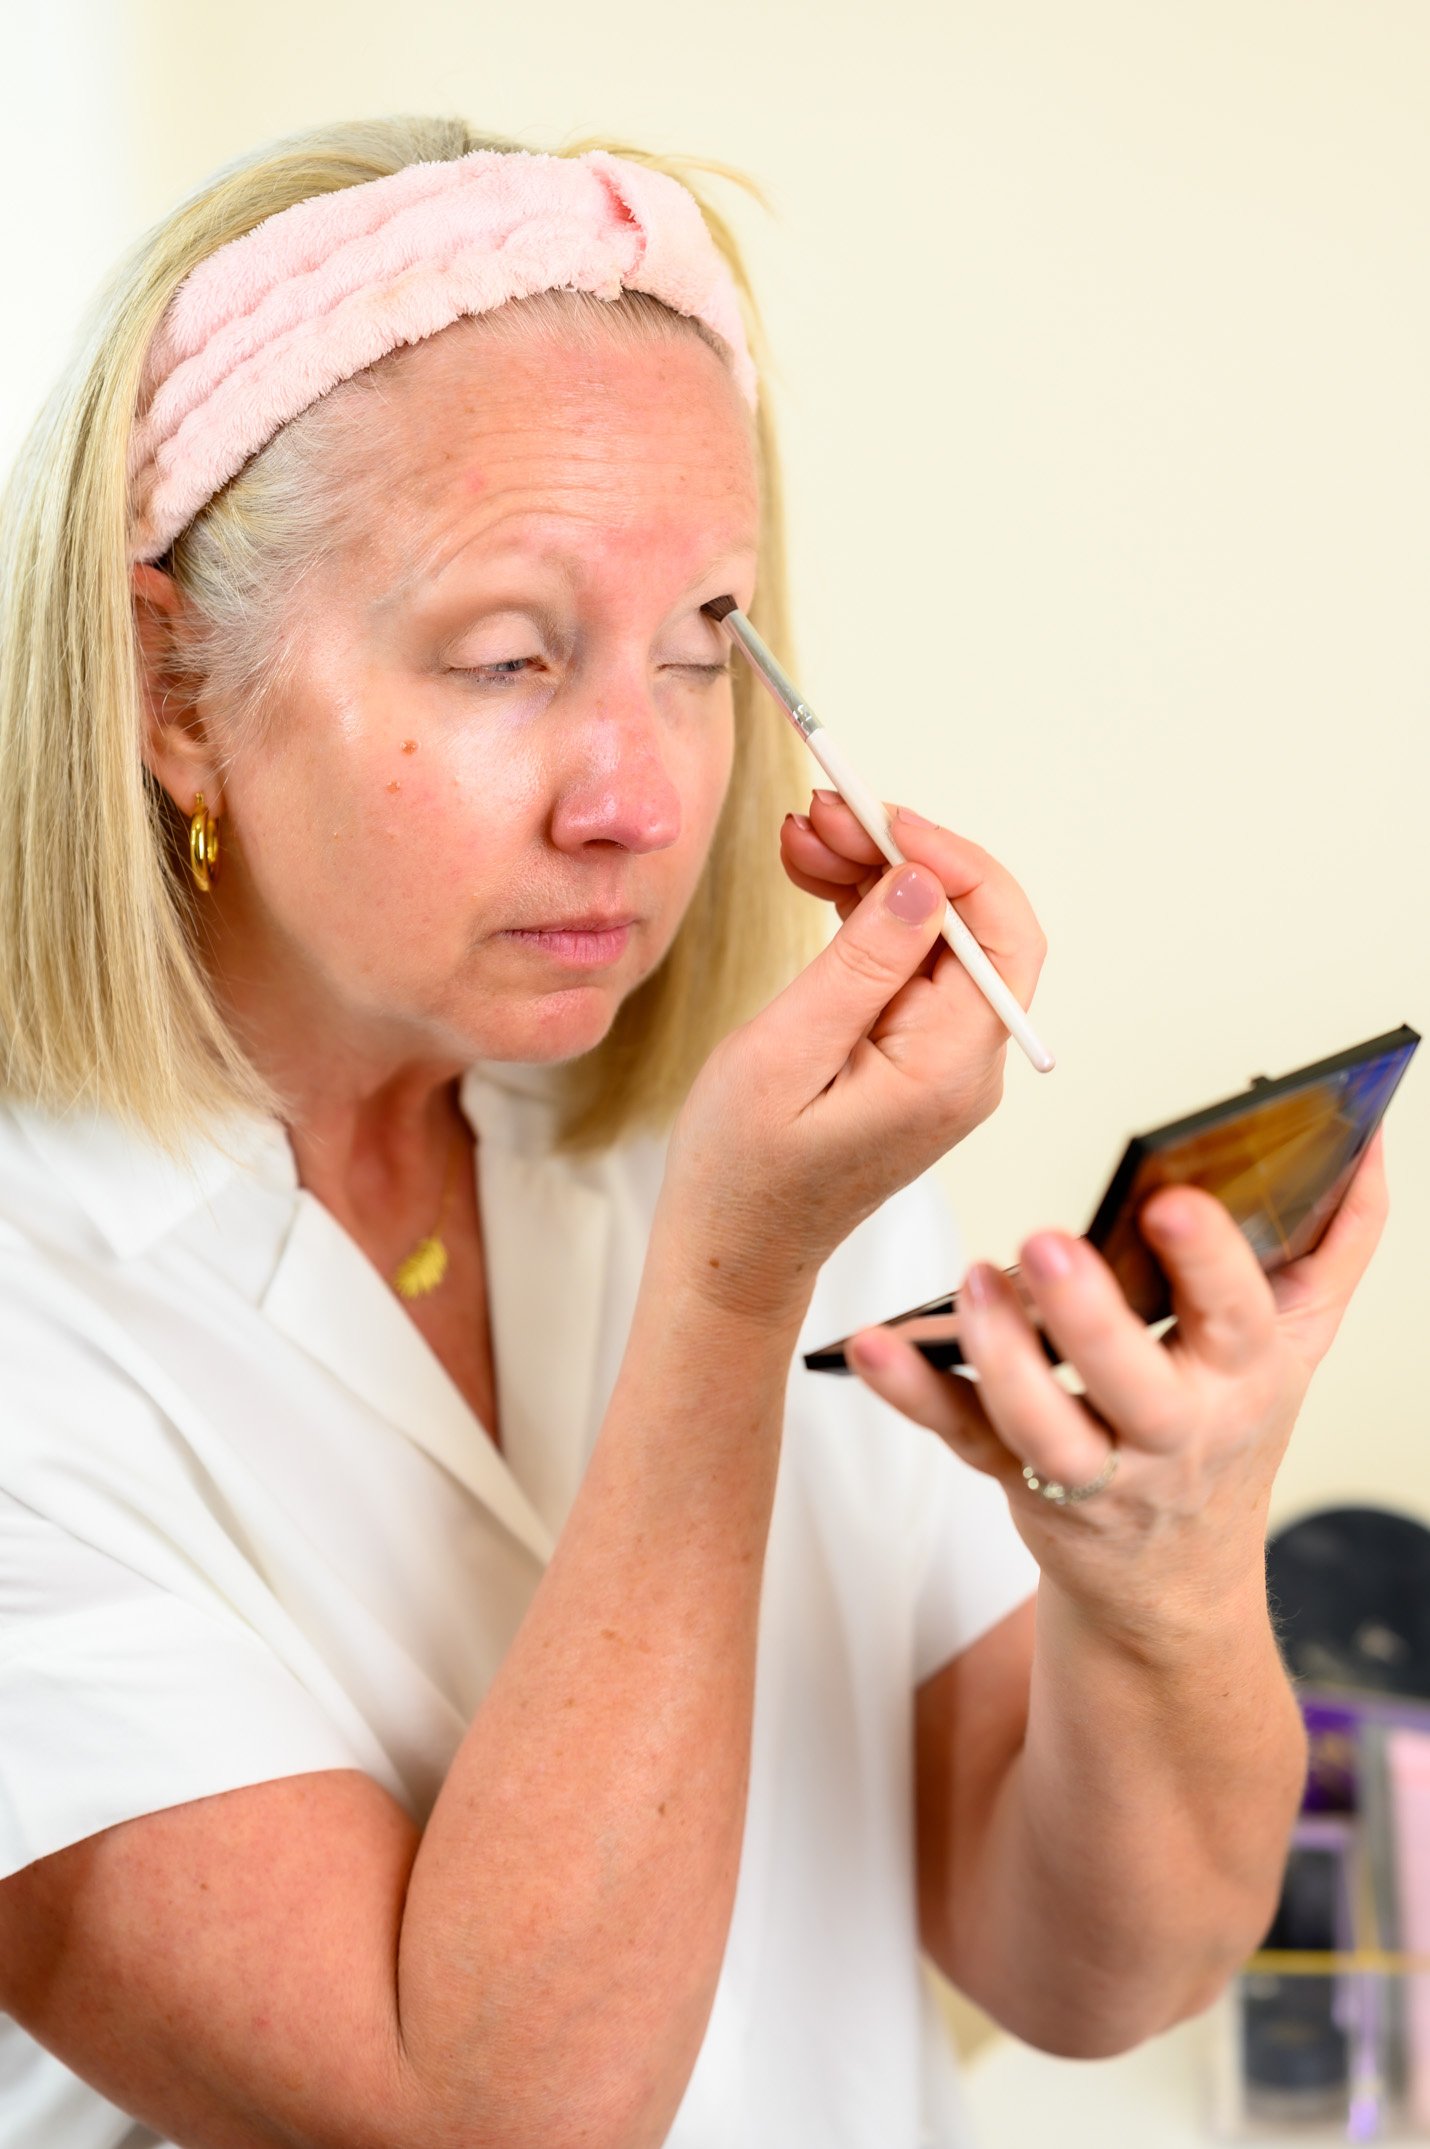
Then I apply “hot fudge” on the outer edges of the hazelnut, taking the application out toward the outer edges of my eyelids onto my brow bones. I try not to apply too much product, but it doesn’t have to be perfect at this point. I’m going to blend everything next.
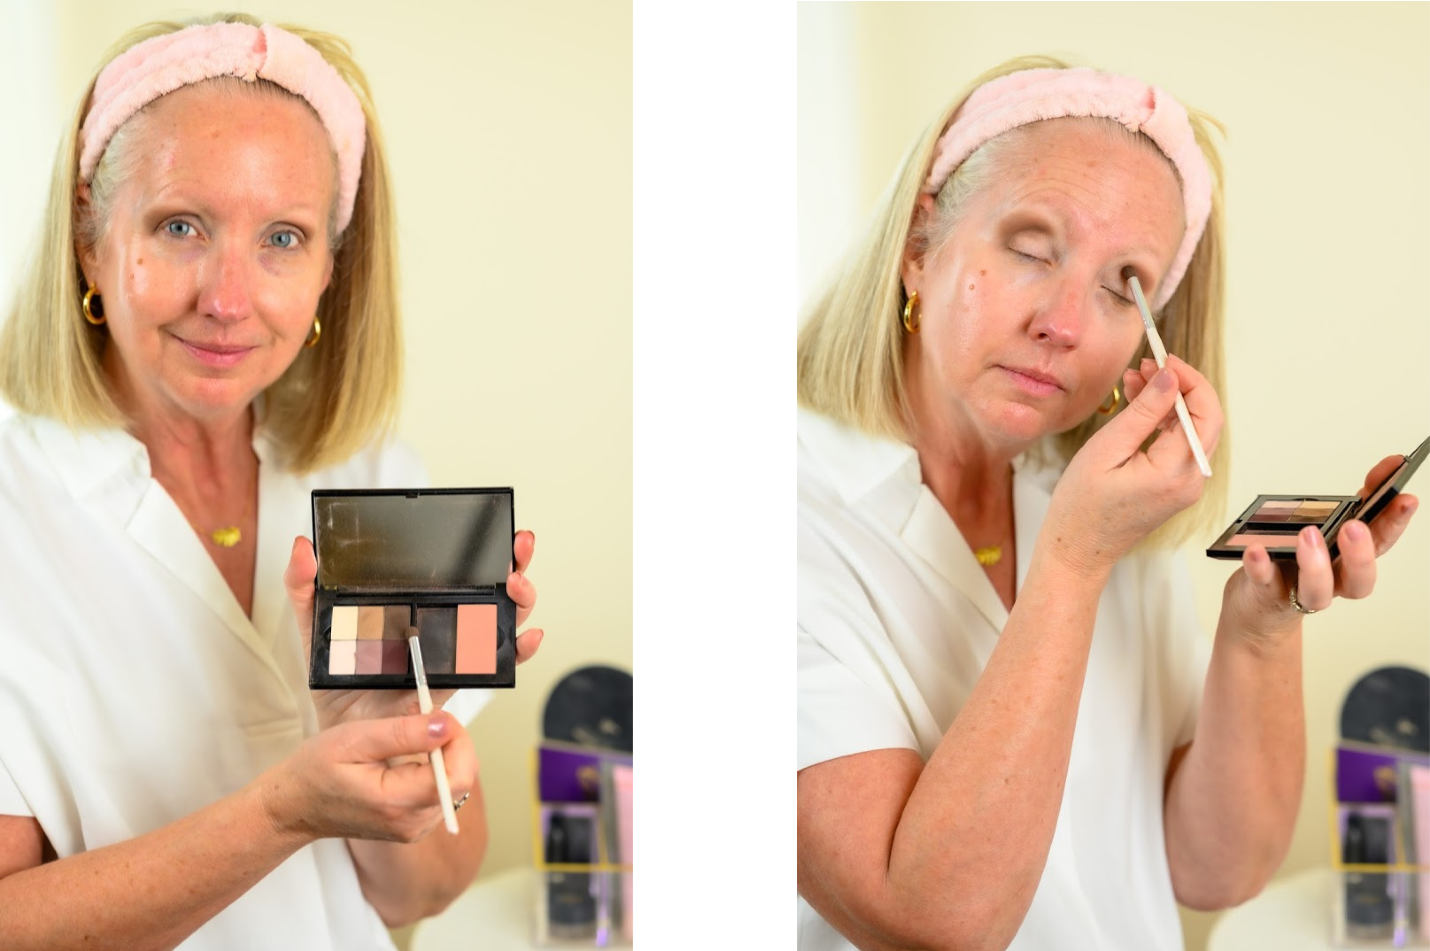
After I have these three shadows the way I want them, I carefully blend everything using this It Cosmetics Airbrush Blending Crease Brush. I blend carefully in small circles, moving from the crease outward. I don’t want to create mud! But these shadows don’t seem to do that anyhow. They blend very nicely. I also think this brush is partly responsible for that though. It’s very soft and doesn’t hold onto color itself, but blends it in nicely.
Next up, eyeliner. I love, love, love the Dior Long-Wear Waterproof Eyeliner Pencil. This pencil is so soft that I’m able to use it to line inside the waterline of my upper lashes with no fear of injury.
I line just along the front of my lash line, not on top of it. Make sense? I keep my eyes open so that I don’t get too much liner above the lash line. I really just want the product right in my lashes almost. And then I line under the waterline very carefully. I don’t line my lower lids anymore. Below you can see before eyeliner, during the process and after.
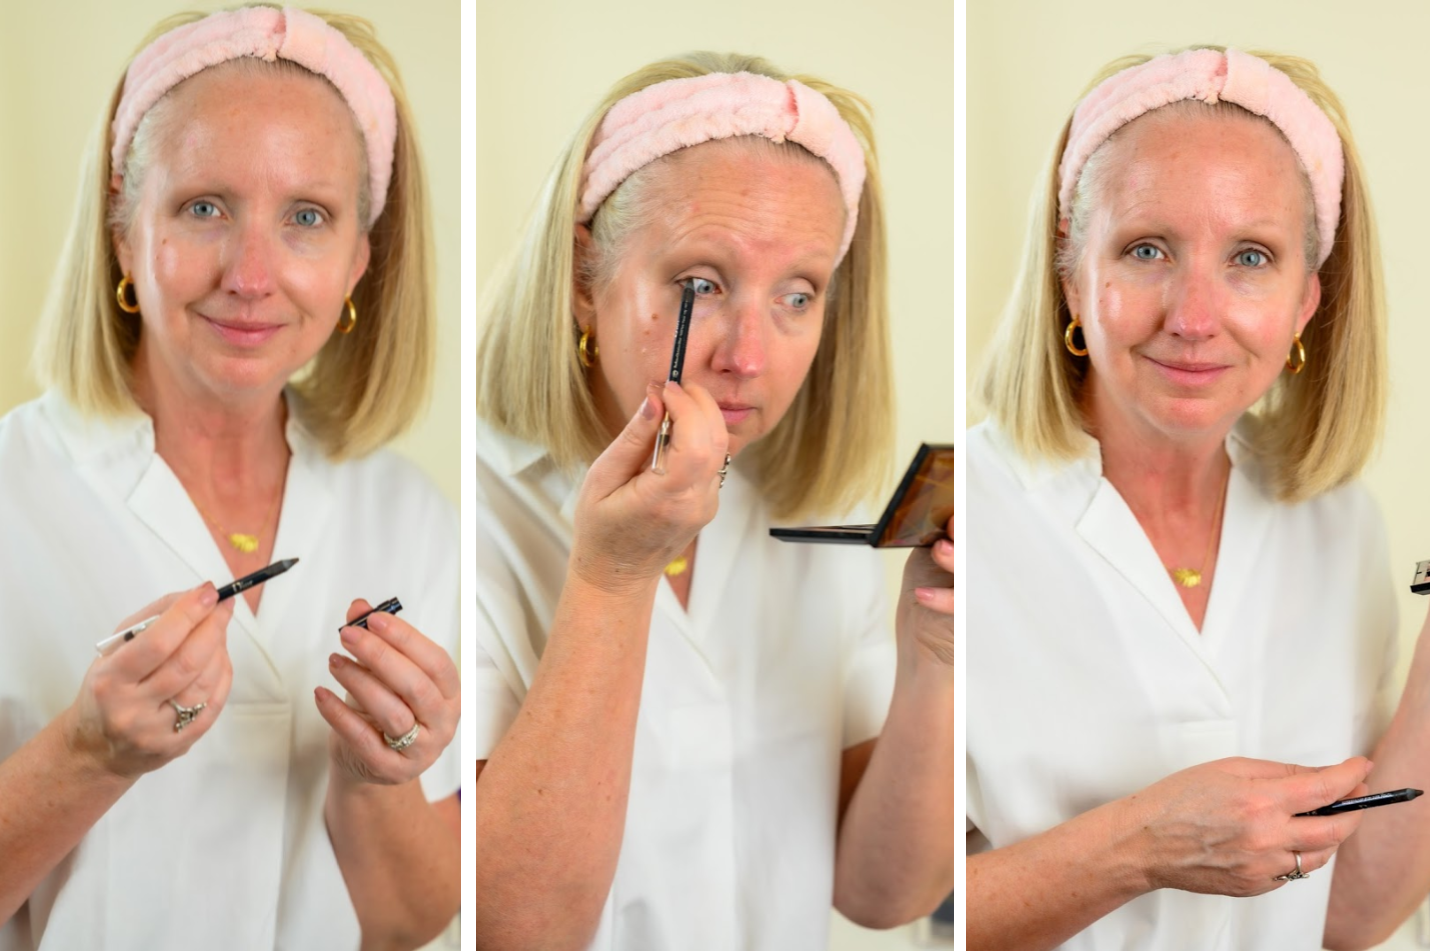
You can smudge your liner a bit with the smudge tool on the other end of the Dior Long-Wear Waterproof Eyeliner Pencil if you’d like. But I try not to put on enough to need that.
Next I apply Lancome Cils Booster XL Vitamin-Infused Mascara Primer on just my upper lashes. And then I immediately apply two coats of Lancome Définicils Lengthening and Defining Mascara, sometimes three. I only apply one coat of the Mascara to my lower lashes.
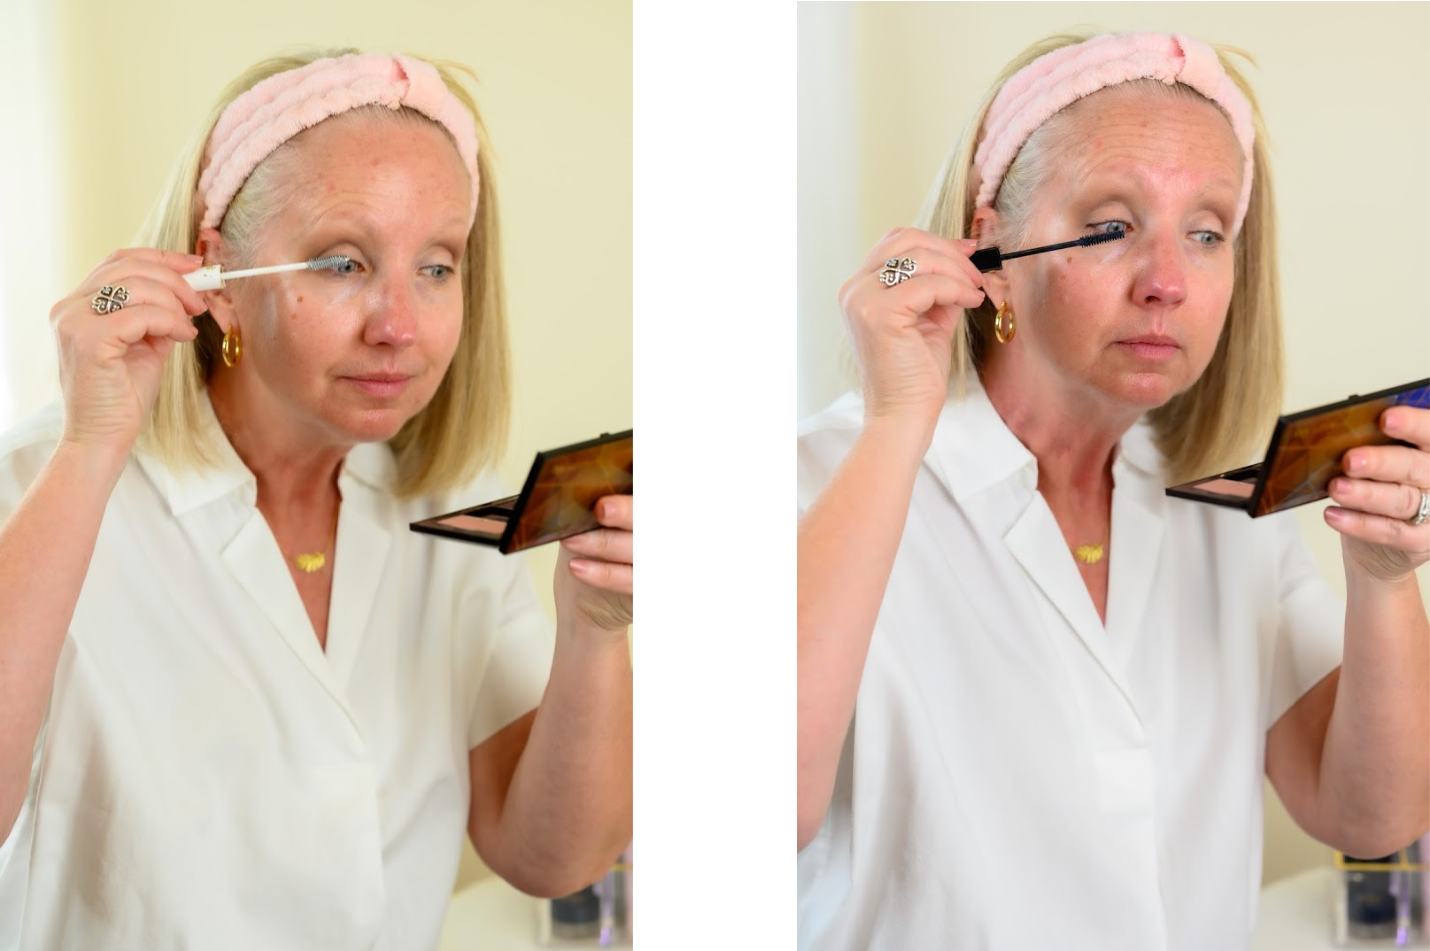
I suppose the Dior Long-Wear Waterproof Eyeliner Pencil is not absolutely necessary, but I do think it makes my lashes longer and keeps them healthier. And I need all the help I can get with my tiny, thin little lashes. Ha! But I absolutely love my Lancome Définicils Lengthening and Defining Mascara. I’ve used it for years and keep going back to it when I try other things for a while. I know I’ve even recommended other mascaras here before, and none of them are bad. But this mascara just truly works best for me over and over. I like that it doesn’t get clumpy and too thick. And this straight wand just seems to work best for me.
Step #3 – Concealer & Foundation
I’m not sure why I do things in the order I do. Go figure. But next, I apply my concealer and then foundation. But first I apply a foundation primer. I’d been using Maybelline FaceStudio Master Prime Blur + Pore Minimize Primer. It’s a dupe of a much more expensive product and I liked that it made my skin feel silky smooth for my foundation application. It also minimized pores.
But I recently received a sample of Benefit The POREfessional Smoothing Pore Primer with another purchase and gave it a try. I was blown away by how well my foundation went on and looked with this primer. So I ordered some and I’m waiting on it to arrive. A good primer should create a smooth surface for makeup application, but it also helps your makeup stay put better and wear more evenly.
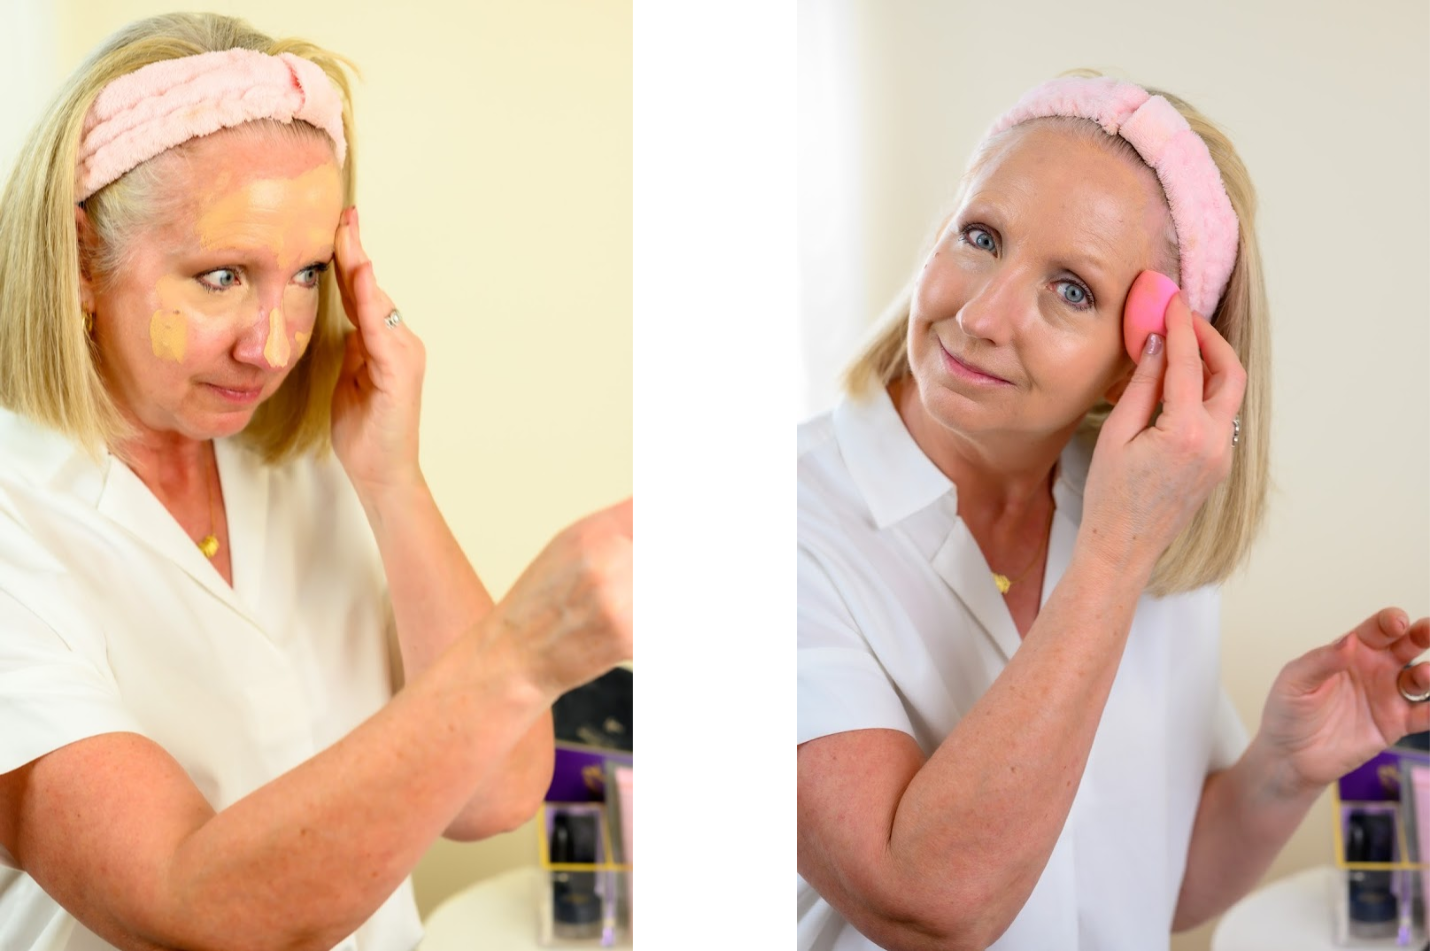
Under my eyes and on any age spots, I’ve been using Born This Way Super Coverage Multi-Use Sculpting Concealer. This is a thick product available in 35 shades. I like this Concealer because in one product it conceals, contours, highlights, and retouches. And because it is thick and creamy it’s easy for me to manipulate. I apply it with the doe foot applicator and then dab on a little more precisely with my ring finger on my left (less dominant) hand.
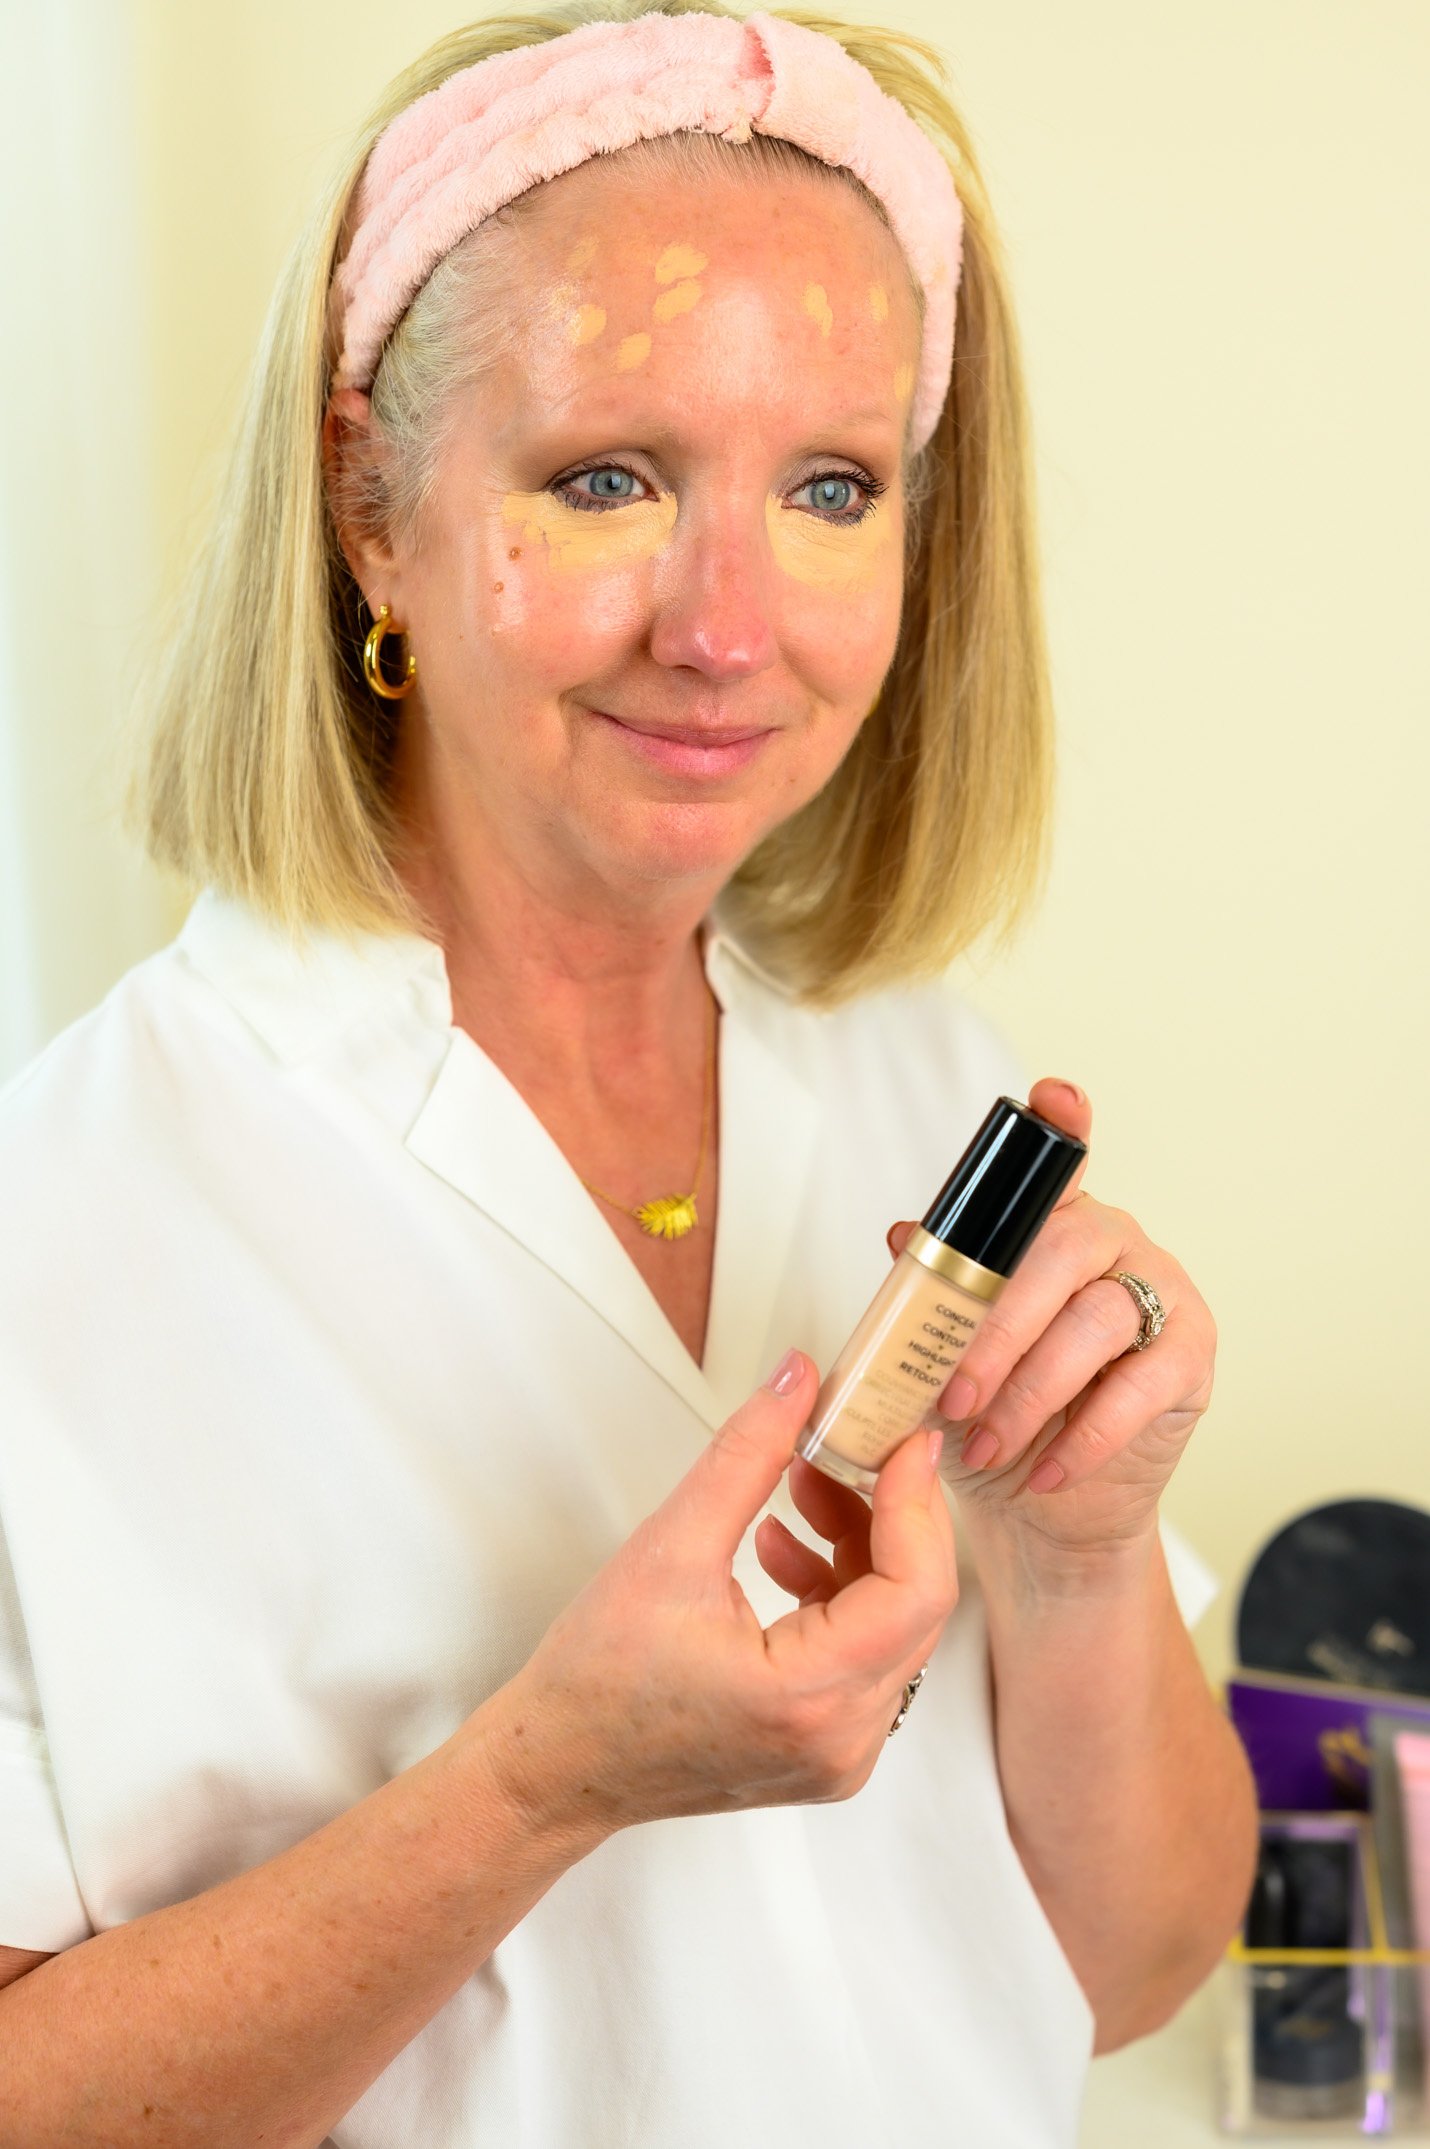
By the way, the photo above is much more yellow than in reality. You can tell that because even my gold necklace and hair are very yellow. The shade of Born This Way Super Coverage Multi-Use Sculpting Concealer I use, Cream Puff, is not at all yellow. It’s a very fair rosy shade.
Next I apply Stila Hide & Chic Fluid Foundation with my fingers. You have to shake this foundation well first, and it’s still very fluid. But after using several very thick creams, I really appreciate the thinner consistency of this makeup. Again the picture on the left turned out yellow. The one on the right is much more accurate.
I’ve been wearing shade “light/medium 1” and I think that’s the wrong shade for me. Now I’m reading online that it’s for light/medium skin tones with yellow undertones. But I actually have neutral undertones, so I’ll probably switch to either light 4 or light/medium 3 when I purchase more. And I will purchase this Stila Hide & Chic Fluid Foundation again. I love the way it wears. It provides full, natural coverage, but feels very light and breathable. I never think about my makeup again once it’s on. I just really don’t feel it.
After applying foundation all over my face and neck, I bounce all over it with the Beauty Blender. To use this little blender, you dampen it and then get as much moisture out as possible, even drying it off with a towel. Then you just bounce all over your face, especially targeting the hairline, nooks and crannies and your neck. I’ve not found anything that blends my foundation as well as the original Beauty Blender. I also recommend purchasing the cleansing bar to keep it clean.
Step #4 – Contouring & Blush
When you’re creating a fresh face or natural look, you don’t necessarily use less product. You just use products that yield a more natural look. So contouring is still important. Proper contouring helps provide definition that our faces begin to lose as we age. #gravity
I’ve been enjoying the It Cosmetics Your Most Beautiful You Anti-Aging Face Palette for a little over a year. At this point, I mainly use the bronzer for contouring, but I do use the blush and highlighter occasionally, too.
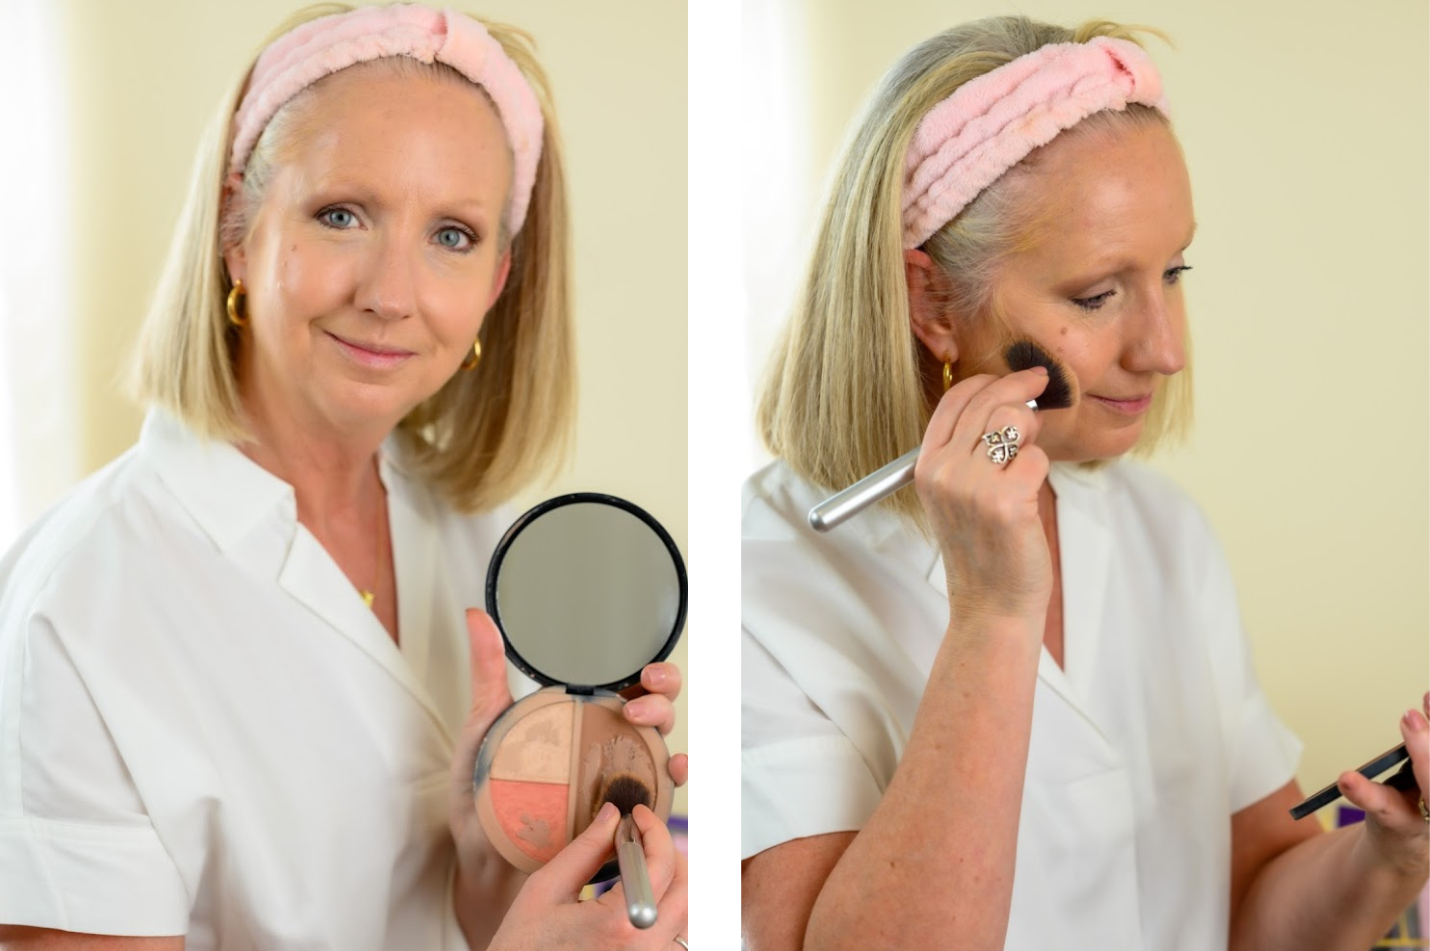
I use the It Airbrush Soft Focus Blush Brush #113 to apply the bronzer at the base of my cheekbones (shown above), a little around my hairline on my forehead, on the sides of my nose, along my jawline and down the center of my neck. Whew! A little of this goes a long way, though. And I always tap off any excess product before brushing onto my face.
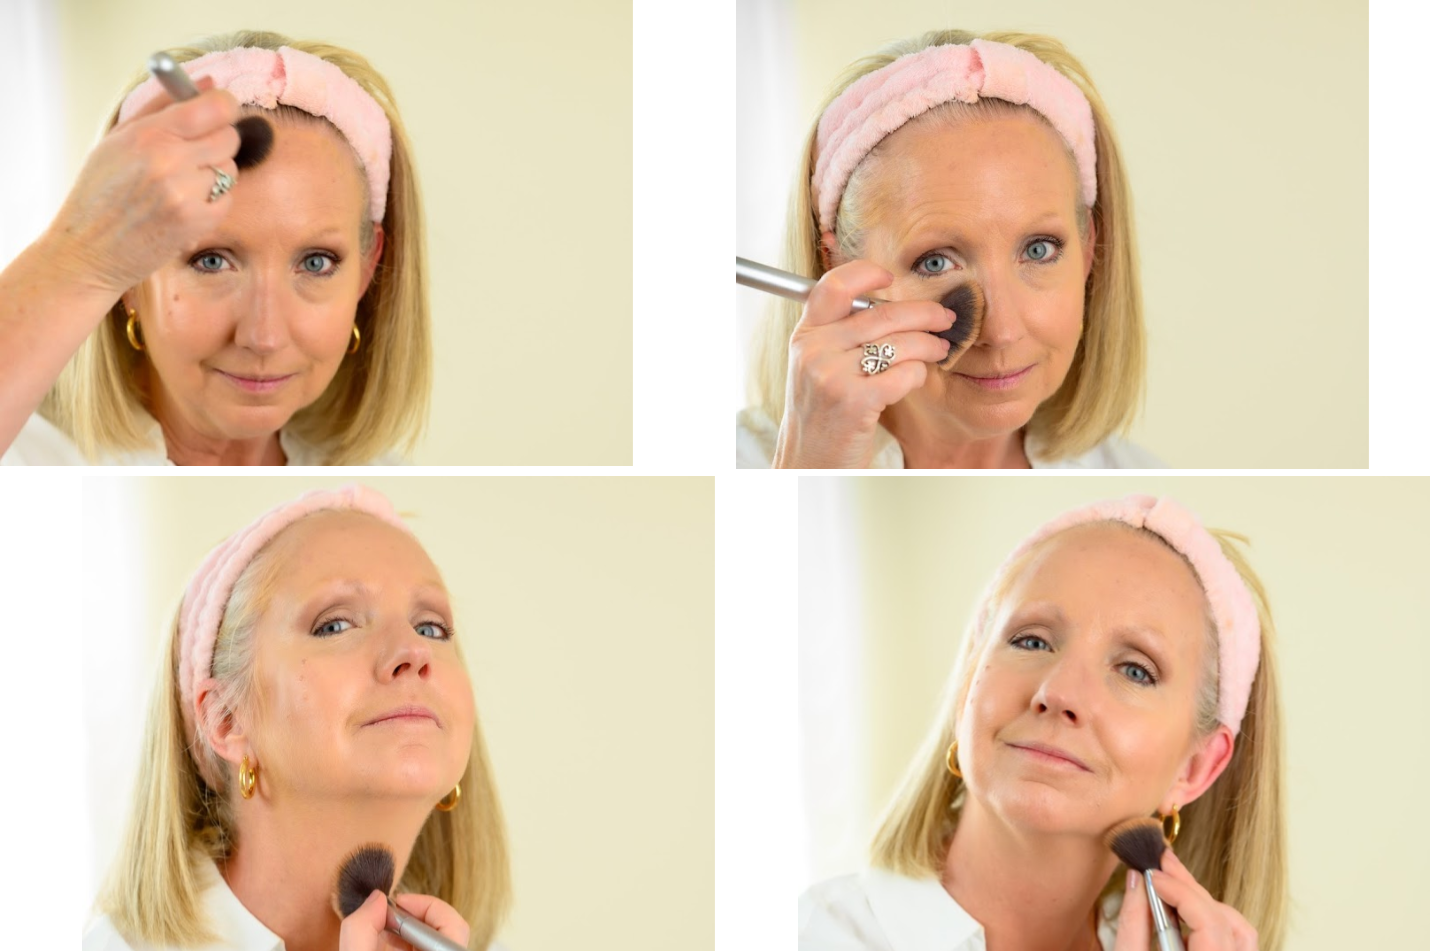
Next, I apply blush just to the tops of my cheeks, from the side of my face toward the apple of my cheeks. I’ve been enjoying the Mary Kay shade “rosy nude.” I apply it with the E.l.f. blush brush.
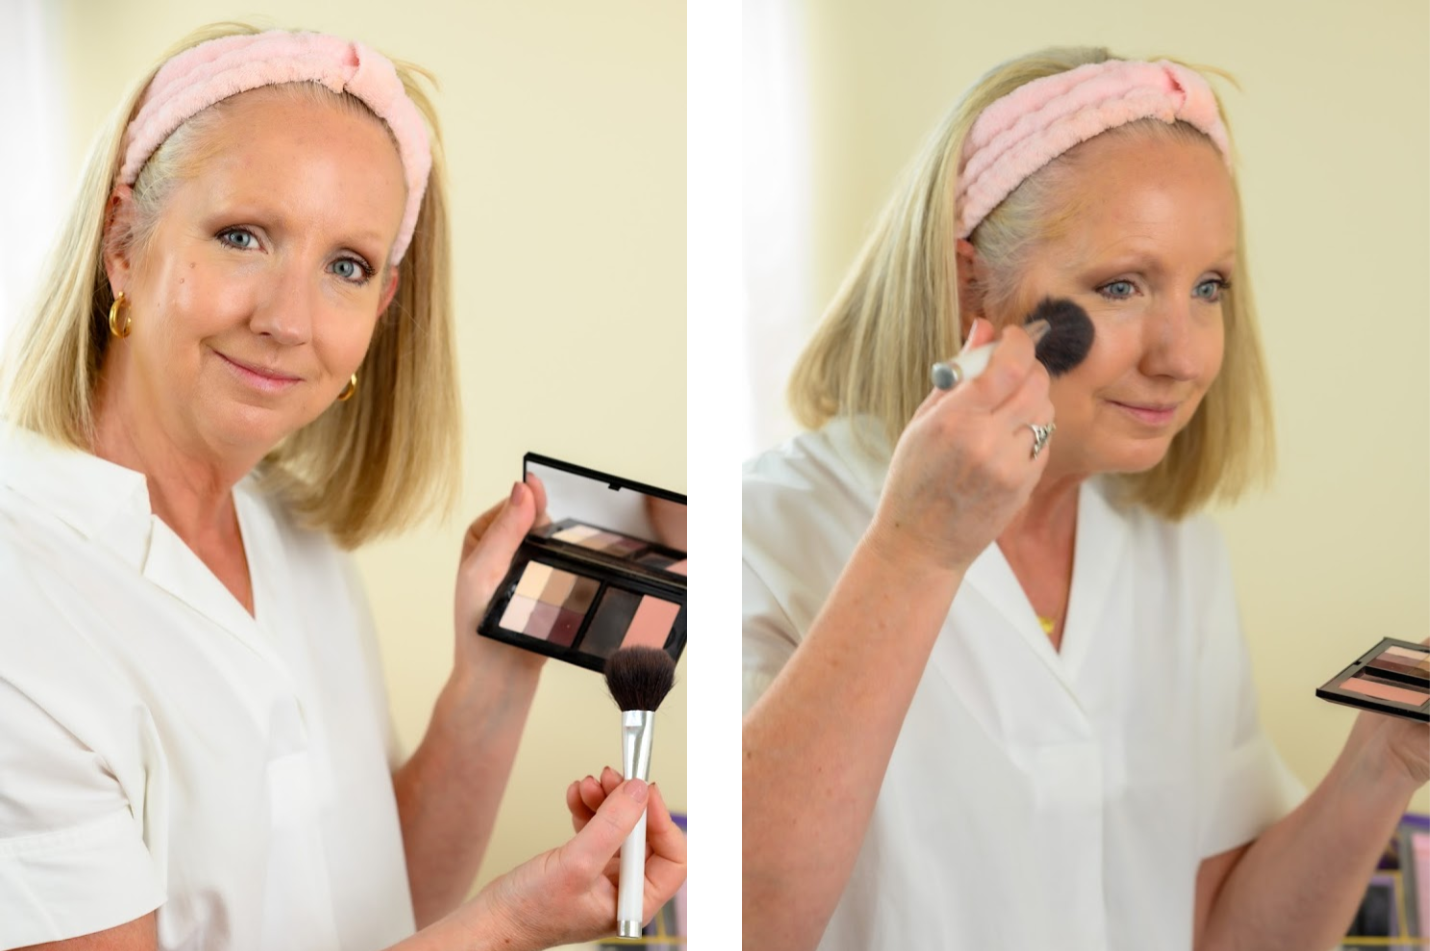
Finally, I use the e.l.f. Total Face Brush to blend the bronzer and the blush all over. I don’t want any lines or blobs of product.
Step #5 – Eyebrows
I’ve discovered that well defined and shaped eyebrows are key to looking more youthful, vibrant and attractive. I first brush my little itty bitty eyebrows up and out with this E.l.f. brow comb and brush. As you can see there are some things I just don’t spend much money on. This brush is just a couple of dollars.
Then I use the It Love Beauty Fully Angled Liner/Brow Brush #217 to apply Urban Decay Double Down Brow Putty to my brows. I shape my brows in what’s called a soft angled low arch. One thing I do know, you don’t want your brows to arch in the center. That makes you look surprised. Know what I mean? Instead, you want to position the arch at the outer one-third of your brows.
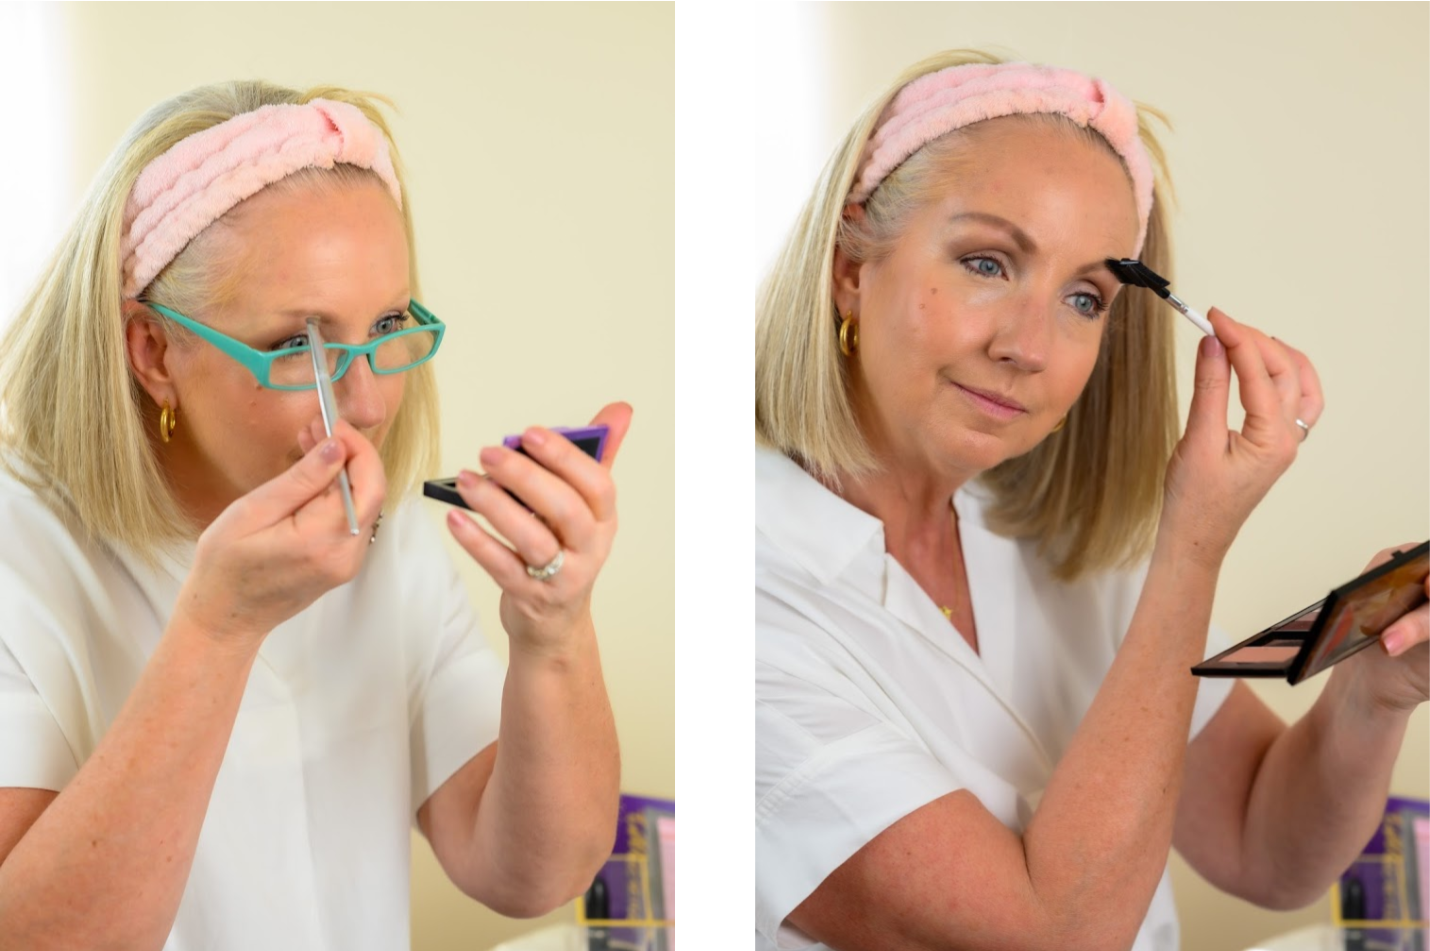
I have to put on some reading glasses to do my brows and it’s still a bit of a struggle every single time. But I’ve learned that that’s the case for most women. So I suggest you simply take your time and do your best. I have gotten better with time and practice, but there are still days…
Step #6 – Lipcolor
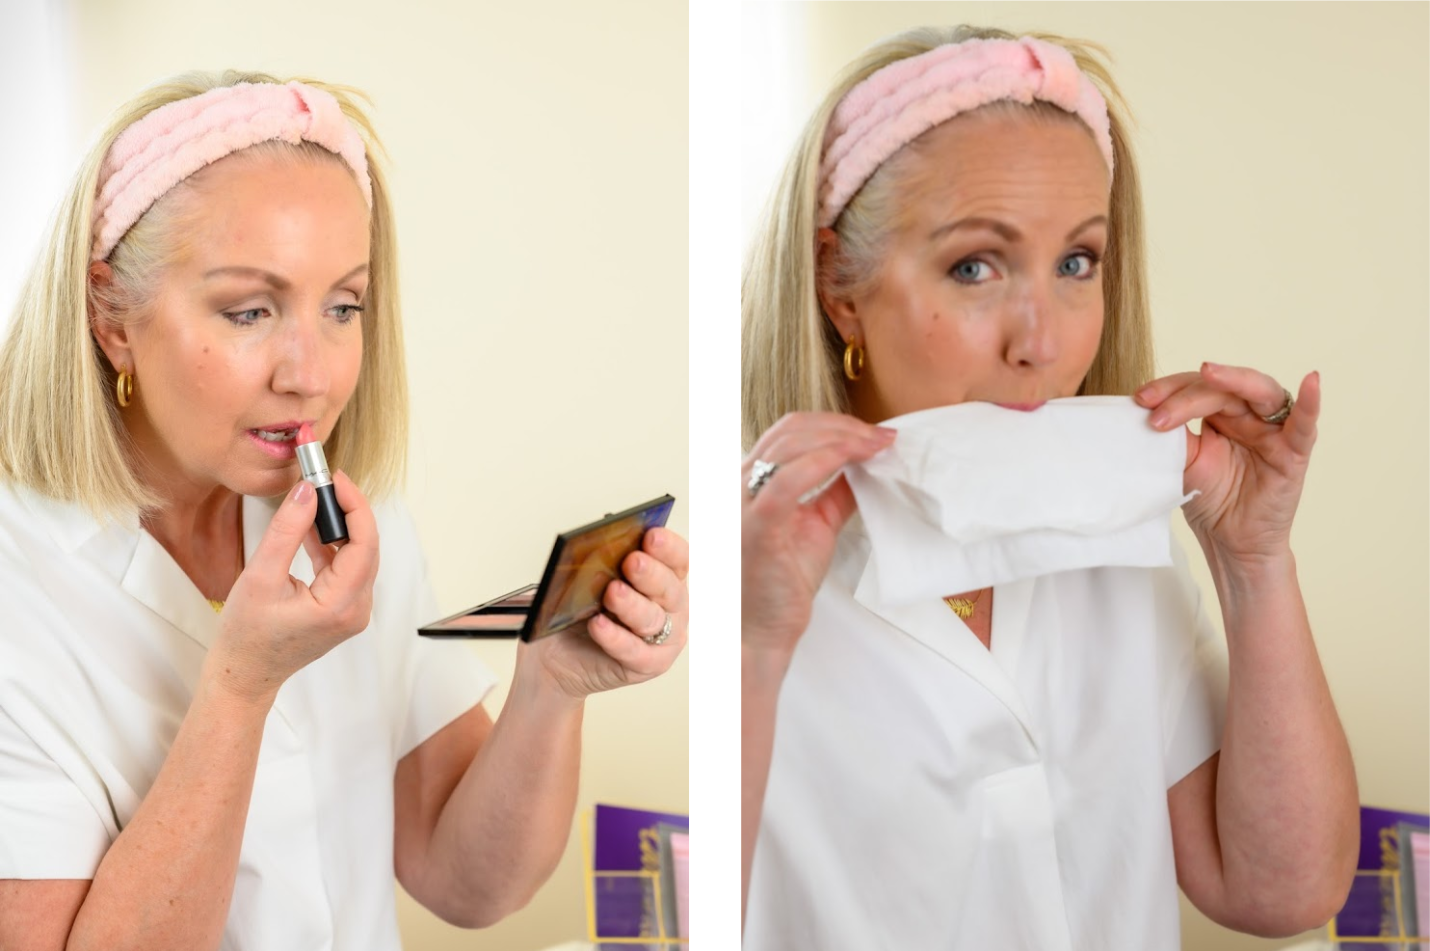
Sometimes I line my lips, but I don’t really have a lip pencil that I’ve been using regularly lately. I do think a good pencil can help prevent lipcolor bleed, but that’s also why I like to stick to softer shades. Dark lipsticks will definitely show more bleed than paler or nude shades. Today I applied MAC Lustre Lipstick in Giddy. It’s a nice true pink for spring and summer. It goes on creamy, but thin.
Step #7 – Optional Setting Spray
I forgot to use any that day, and I forget to use it most days, in fact. But I do like the Urban Decay All Nighter Long-Lasting Setting Spray. Once your full face is on, you simply shake the bottle well and mist your face two to four times with this sheer spray. It actually lowers the temperature of your makeup – foundation, concealer, eyeshadow, blush, you name it – to keep everything in place. It also leaves my face looking smooth and fresh. I’m not wearing any in this photo, but I often wear it in my photo shoots. It also prevents your makeup from coming off onto your clothes.
Whew! That was long. But I wanted to give you as much feedback on the products I use as possible. If you’d like to know more about any product in particular, just tell me in the comments and I’ll stay on top of them today.
Don’t forget that if you shop through Sheryl’s Mary Kay store to use the code “dressed for my day” in the promo code space (no quotes needed) to receive $10 off your first order. And Sheryl says she always ships free, too. Plus, she’ll be glad to answer any questions you have. You can contact her right there at the store front. She also told me she can help you use the MK Skin Analyzer app to correctly determine your skin care and foundation shade.
Thanks so much for reading today. Have a blessed and beautiful day!
Shop the Post:
You can shop the look through the links in the copy above or through the shopping widget below. Sale prices are not always reflected in the widget, so click through to get pricing info. Remember, if you purchase anything through these links I potentially earn a commission, but at no cost to you. Thank you for shopping through Dressed for My Day. I am grateful!
Sale Alert
In totally unrelated news, I wanted to tell you about a deep discount sale that just came across my desk. J.Jill, a favorite for many of my readers, is offering 50% off select full price styles and 40% off everything else with code 40APRIL. Plus they’re giving you flat rate shipping of $5.95 or FREE Shipping on purchases of $125 or more. ALSO I just added a Shop My J.Jill Favorites Page today!
Don’t Miss a Post:
If you like what you’re seeing here at Dressed for My Day, I invite you to subscribe to my email list. You can receive an email each time I post (about 6 times weekly) or just on Saturdays. You choose! But you’ll also receive the password to open up all the subscriber freebies I offer. You can subscribe HERE.
Did you catch yesterday’s post about online shopping? I’ve got tips that will save you money and time while you shop online.
Blessed for My Day
Some days I choose well. Others I make much poorer choices. And I’m a firm believer in progress over perfection, so I try not to be too hard on myself if I get off course occasionally. But I also have to remind myself that a series of decisions leads me down one path or the other.
If I consistently choose to seek the Lord, to meditate on His Word and to walk according to His counsel, I will be a woman marked by God’s blessing. But if I repeatedly choose lesser things, I may miss some of the very things He longs to bless me with. What does God’s blessing look like? According to Psalm 1:1-3 a blessed woman is one who consistently bears fruit, exhibits signs of life and never lacks for the sustenance her soul craves.
Blessed is the man
Who walks not in the counsel of the ungodly,
Nor stands in the path of sinners,
Nor sits in the seat of the scornful;
But his delight is in the law of the Lord,
And in His law he meditates day and night.
He shall be like a tree
Planted by the rivers of water,
That brings forth its fruit in its season,
Whose leaf also shall not wither;
And whatever he does shall prosper.~ Psalm 1:1-3
Very informative! Your makeup looks great!
Thanks Lori. I’m glad you enjoyed the post. Thanks for reading.
I always enjoy seeing what products other gals my age use. Thanks for sharing. You look beautiful. I had tried that Stila foundation but returned it to Ulta because I wasn’t sure. I may need to revisit that! Finding a new foundation can be really difficult. I’ve had a good experience with the Born This Way concealer, too, and you get a lot for your money with this product. Have a wonderful day!
That was so helpful! Thank you for providing so much detail particularly on applying your makeup- you always look great!
P.S. what color brow putty do you use?
I had been using a darker shade, but I just got in the Taupe Trap. I think it will be a better fit. Supposed to be universally flattering. When I had purchased mine (shown here) they didn’t have any other shades and I needed something pronto.
Thank you for this. So many articles, etc. lead us to believe that as we age, we should gradually just stop wearing makeup. This may work for some (I have so many co-workers who can look great with almost no makeup), but for those of us with light coloring, no/little makeup is just not a great option. (My complexion and coloring are very similar to yours. And I look like a different person without makeup. Like seriously people don’t recognize me. Or comment “What’s wrong with your eyes?” since my eyelashes and eyebrows are nearly white.) So seeing a full-makeup routine, with full disclosure that natural looking makeup doesn’t mean less makeup, is so encouraging and helpful! You look lovely. I’ll definitely try some tips. Although do you have a suggestion for eyeliner on the outside of your lids? I cannot wear liner on my waterlines. It irritates my eyes. And because of my light coloring some liner is a must!
Thanks Danetta. I’m glad you enjoyed the post. Yes, I use the same pencil on the outer edges too. Works perfectly and has a sponge tip for smudging if needed. I know there are cheaper pencils and I bet the Mary Kay option would be nice but I just really like how soft this one is.
So many steps, so many products!
Hahah! It seems a lot worse written out like this than it really is. But it is what it is! ?
Thank you for sharing this today! It was very informative and gave me some ideas for getting out of my makeup rut. I appreciate you taking the time to show and explain how you do everything. You are darling with & without makeup! I look forward to your post every day! Blessings!
That’s a major routine!
Hahaha! Looks worse than it is here. And I don’t do this but a few times a week really. But yeah, it is what it is.
Beautiful! What a great tutorial! Could you give some insight into figuring out what a person’s skin undertones are? I have a hard time with this; I’m fair to medium, but sometimes I see yellow and sometimes just red-ish…my veins sometimes look blue and others green…would this be “neutral”???♀️
Thanks for the makeup lesson. I like a natural look also. Your look is natural and understated: very pretty. I so appreciate that you are willing to share your secrets with us.
Thanks for sharing scripture too.
Suzanne
I think sometimes, I should wear a little makeup but then I wait a minute and the feeling passes. When I was young, I could contour along with the best but it’s been years since I wore makeup. At first I though I should not wear it because I got saved and looks shouldn’t matter but I came to realize that was wrong thinking. Now, I don’t do it because I’m lazy.
You did a bang up job on this post and I know it will help a lot of women. Brave, beautiful and apparently a workaholic. LOL That was a lot of work.
Well done! Loved your entire tutorial. Thank you!
I’m always looking for tips. Now that I’m getting older, I wonder what to use to hide my wrinkles! and brows, oh my – they have disappeared! And I hate brows that are too thin or too thick! Thank you for being vulnerable enough to share with us.
Hi Suzy. I don’t really think we can hide wrinkles. ? So I think the key is to highlight our best features instead. Thanks so much for sharing. ?